
Floodwater can push bacteria and chemicals into a private well in minutes. Private well water testing after flood should come first. Do not rush to use the tap. Disinfect a well after flooding only after a check of the system and a plan to collect a clean lab sample. This guide explains what to do right now, how to sample for a state certified lab, how shock chlorination works, how to flush the plumbing, which tests to order, and when to call a licensed well contractor. If your home also took on water, our team can help with water damage restoration and cleanup while you wait for lab results.
Immediate steps after floods
Stop using the well for drinking or any food prep right away. That includes ice, brushing teeth, washing food, and mixing baby formula. The Centers for Disease Control and Prevention states that you should not drink well water after a flood until testing confirms it is safe. Use bottled water in the meantime. You can read that guidance on the CDC page titled How to Disinfect Wells After an Emergency at cdc.gov.
If you smell fuel or chemicals at any faucet, do not rely on boiling or chlorine. Switch to a safe source at once. Contact your local health department for next steps. That warning also comes from the CDC page above. If you are unsure about the well, call for help before you touch anything.
Look over the wellhead without opening anything. A quick visual check can save time and prevent a bad mistake. Signs of trouble include a missing or cracked cap, damage to the casing, exposed wiring, silt or debris around the cap, or a pump that short cycles. If you see any of these, stop. Call a licensed well contractor. The CDC recommends that wells with submerged or damaged heads be serviced by a well or pump professional. Working on wells after a flood can be hazardous. The same CDC page gives that advice.
If your property has standing water in the crawlspace, walls, or flooring, get structural help first. Drying early can prevent mold growth. We can respond fast for storm damage and flood recovery while you work through water safety.
First checks for well safety
Private wells vary by depth, casing, and placement. Floods create similar risks across those types. Sediment and surface water can carry bacteria into the well. Fuel from vehicles or tanks can leak. Pesticides can drift in. A few calm checks will inform your next step.
Confirm that power is safe. Turn off the pump at the breaker if you suspect electrical damage. Do not touch wet electrical components. Leave pump work to a pro if power safety is in question.
Inspect the ground around the well. Erosion can expose the casing. A tilted head or eroded pad indicates possible damage. Sediment against the cap or loose conduit points to intrusion.
Check the water visually at an outside spigot if the cap looks intact and you feel it is safe to run the pump briefly. Cloudiness, visible debris, or a sheen on the water surface are warning signs. Strong fuel odor demands a switch to bottled water and a call to health officials. Do not test or disinfect until those chemical concerns are addressed by authorities.
If the wellhead was overtopped by floodwater, plan to pump and flush before any disinfection step. This preflush clears surface water from the casing. Extension services often advise pumping several well volumes. Suggestions range from two to four volumes. Direct discharge away from your septic tank and any ditches or streams. The aim is to reduce the load of contaminants before the chlorine treatment. University guidance mirrors this approach. You can view a practical overview from the University of Georgia Extension and University of Missouri Extension at their sites. See the concept summarized by UGA and MU Extension here: UGA Extension and MU Extension.
Safe water options
Plan for safe water through the testing period. Bottled water is the simplest choice. Ice from trusted commercial sources is acceptable. Some communities offer distribution sites after large storms. Water hauled from a public supply can bridge the gap if handled in clean containers. If you only suspect bacteria and no fuel or chemical odor is present, boiling water for one minute can inactivate most germs. At high elevation with low atmospheric pressure, boil for three minutes. Boiling does not remove chemicals. These recommendations follow CDC emergency water guidance at cdc.gov.
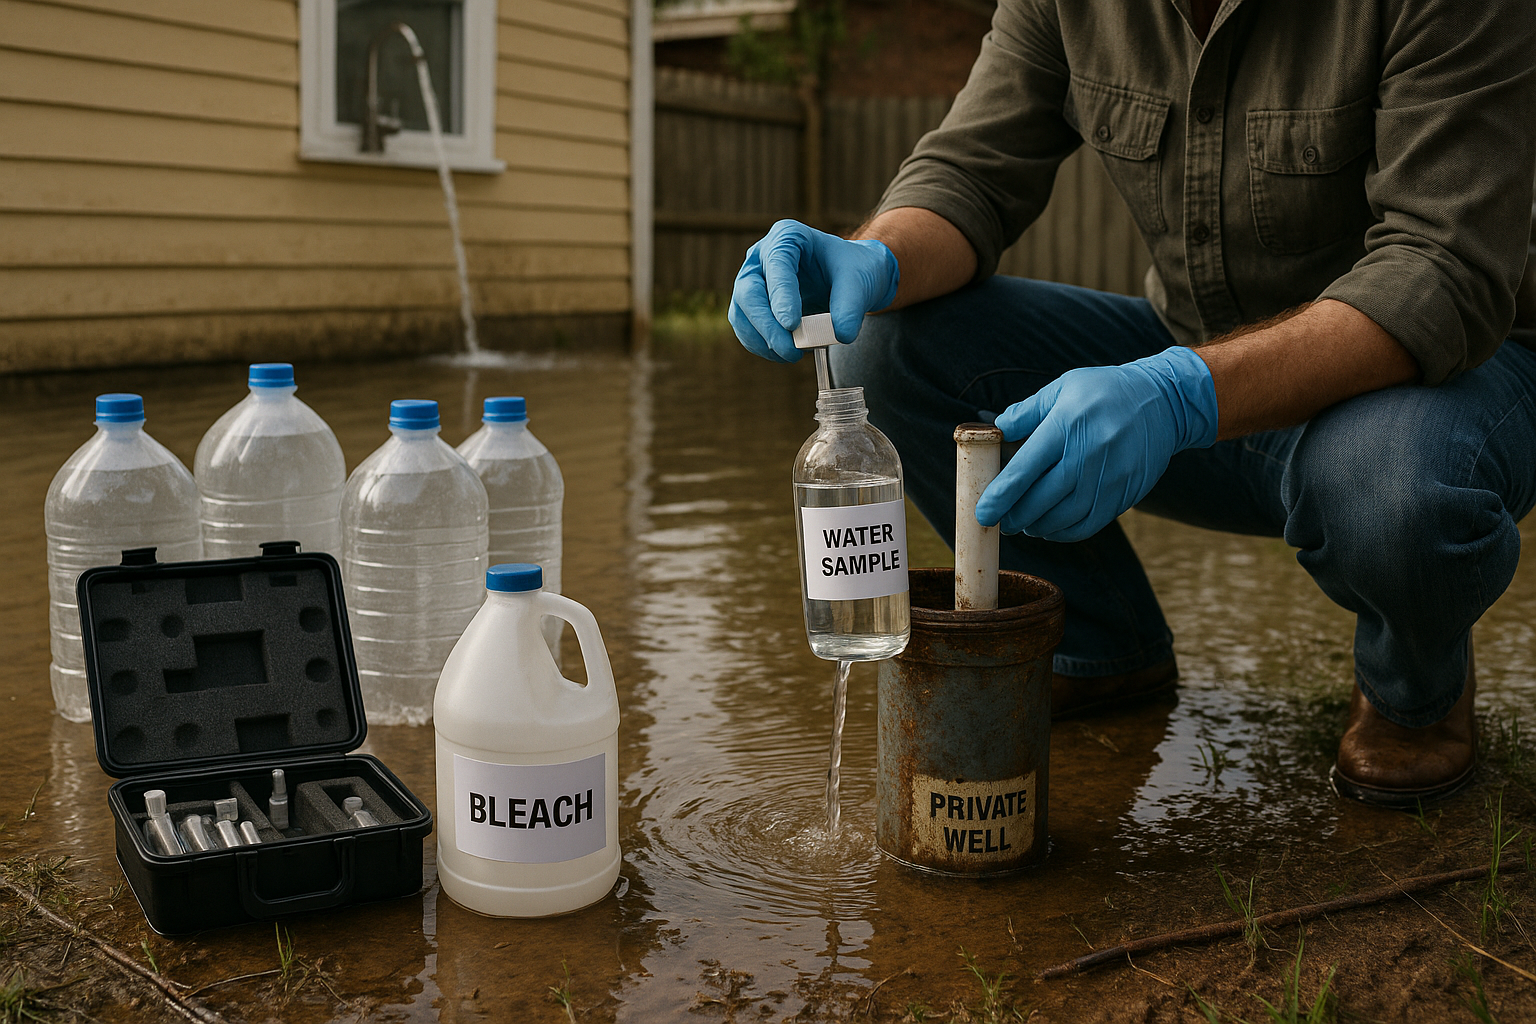
How to collect a lab sample
Accurate private well water testing after flood depends on clean sampling. Work with a state certified laboratory. You can find one through your state health department or the EPA private wells page at epa.gov. Ask the lab for sterile bottles and instructions. Use only the bottles they provide. Many labs use one hundred milliliter bottles with preservative. Keep the seal closed until you collect the sample. State and university labs stress that sterile containers are required for valid bacterial results. See examples from Colorado Department of Public Health and Environment and Penn State Agricultural Analytical Services Lab at cdphe.colorado.gov and agsci.psu.edu.
Choose a cold water tap for the sample. A hose bib that is served by the main line but is not softened is a good pick. Remove the aerator or any screen. Run the tap for two to five minutes to purge the line. Wash your hands. Do not touch the inside of the cap or bottle. Open the bottle only when you are ready to fill to the mark. Do not rinse. Fill the bottle to the designated line. Cap it immediately.
Keep the sample cold. Store at four to ten degrees Celsius in a cooler with ice packs. Deliver to the lab within the stated hold time. Many labs require receipt within twenty four to thirty hours. Do not freeze. Complete any chain of custody form the lab provides. The hold time and temperature control are key for accurate results. State lab pages confirm that bacterial samples must be collected in sterile lab bottles and delivered within the lab hold time while kept cold. See the CDPHE and Penn State links above for that requirement.
Plan the timing so the lab can run the sample the same day. Ask the lab which days they accept bacterial samples. Arrange transport before you start the shock chlorination step. You will need a follow up sample after the disinfection and flush.
Shock chlorination steps
Shock chlorination is the standard procedure to disinfect a well after flooding when the well is structurally sound. If the wellhead was submerged or shows damage, the CDC advises hiring a well or pump contractor. That caution appears on the CDC emergency well disinfection page at cdc.gov. If you plan to proceed with a do it yourself treatment on an intact well, follow a tested method.
First calculate the volume of water in the well. Volume depends on the diameter of the casing and the height of the water column. Many extension offices provide tables and formulas for this step. Use plain unscented liquid household bleach with sodium hypochlorite between five and eight point two five percent. Alabama Cooperative Extension and University of Florida IFAS provide dose guidance and steps. Read ACES Flooded Wells Shock Chlorination and UF IFAS Private Wells 101 pages at aces.edu and edis.ifas.ufl.edu.
Turn off power to water treatment units such as softeners and reverse osmosis systems. Bypass them if possible. Remove or bypass point of use carbon filters before you chlorinate. Chlorine can damage some media. Plan to sanitize or replace cartridges before you put them back in service.
Mix the calculated bleach dose with clean water in a bucket. Use a clean funnel to pour the solution into the well through the cap opening. Take care with fumes. Wear eye and hand protection. Avoid spilling bleach on clothing or surfaces.
Reconnect the pump power. Attach a clean garden hose to an outdoor spigot. Run the hose back into the well. Recirculate water for twenty to thirty minutes. This blends chlorine into the entire water column and washes the casing. Stop recirculation and go inside.
Open each cold water tap one at a time until you smell chlorine. Run hot water taps briefly as well so chlorinated water reaches the water heater. Do not use large volumes of hot water. Shut each tap once the odor is present. Flush toilets so chlorinated water reaches those lines too. The objective is contact with every fixture.
Leave the system idle so the chlorine can sit in the well and plumbing. A contact time of at least eight hours is common. Many guides suggest a range of eight to twenty four hours. ACES and UF IFAS both describe that window. Their pages also note that homeowners should not drink the water until tests confirm it is safe. CDC gives the same direction in the emergency well guidance linked earlier.
After the contact period, go outside and flush water through hoses until the chlorine smell fades. Keep this discharge away from your septic tank, drainfield, gardens, and any stream or pond. Highly chlorinated water can kill beneficial septic bacteria and harm plants or aquatic life. Continue until no chlorine odor remains at any outdoor spigot.
Open indoor taps and flush until you no longer smell chlorine at each fixture. Move room to room. Take your time. Restore softeners and filters only after you follow the manufacturer steps for sanitizing. Replace carbon cartridges that were bypassed or exposed. Do not rush this step. Residual chlorine at high levels can shorten the service life of treatment media.
This sequence is the core of shock chlorination. Extension sources describe recirculation, running chlorinated water to each tap until a chlorine odor is noted, waiting for eight to twenty four hours, and flushing until the odor is gone. Then the next step is testing. Read ACES and UF IFAS for reference using the links above.
Flush plumbing and devices
Flushing clears high chlorine and stirred sediment from the system. Plan where the water will go before you open any valves. Use outdoor hose bibs first. Keep discharge away from your septic system. Disperse over a gravel area or a grassy patch that drains well and does not connect to a stream.
Work in phases. Clear outdoor lines. Then open indoor cold taps one at a time. Follow with brief hot water flushing to move treated water through the water heater. Do not drain the heater completely. Check that chlorine odor has faded at each fixture.
Clean or replace faucet aerators that trapped debris. A clogged aerator can give a false impression of persistent contamination by restricting flow or holding residue. Clean shower heads and any prefilter housings. Reinstall or restart water treatment devices only after they are sanitized per the manufacturer instructions. Follow the manual for water softeners, reverse osmosis storage tanks, and carbon systems. Many makers require a disinfectant step and a full rinse before use.
What to test and when
Order a post flood test panel from a state certified lab. The CDC recommends at minimum total coliforms, E. coli, nitrate, pH, and total dissolved solids. This is the baseline for bacterial safety and basic water chemistry. See CDC guidance on private well testing at cdc.gov.
Request additional tests if your situation suggests more risk. If fuel could have reached your property or you smell a solvent like odor, ask the lab for a volatile organic compounds screen. Compounds such as benzene, toluene, and MTBE fall in this group. VOC testing uses different bottles and hold times. Call the lab for instructions before sampling. If your area has heavy agriculture or you suspect a septic issue, keep a close eye on nitrate. Speak with your health department if anyone in the home has gastrointestinal symptoms. They may guide you toward parasite testing if needed.
Collect the first bacterial sample after you finish shock chlorination and flushing. Test when no chlorine odor is present at the tap used for sampling. Some extension offices advise taking a follow up bacterial sample one to two weeks after an initial clear result. That second sample helps confirm that bacteria were fully removed and did not rebound. UF IFAS and Missouri Extension discuss retesting if a first sample passes but the well recently flooded. See UF IFAS and MU Extension at the links shared earlier.
Chemical hazards and fuel smells
Chlorine does not remove chemicals. Boiling does not remove chemicals either. If you notice a fuel odor, an oil sheen, or a chemical taste, stop all use of the well for drinking and cooking. Switch to bottled water. Call your local health department or state environmental office for direction. The CDC emergency well page stresses this point. You can view that caution at cdc.gov.
Possible sources include gasoline from vehicles, diesel from generators, heating oil tanks, pesticides, and household chemicals that spilled during the flood. VOC testing can confirm the presence of fuel related compounds. Carbon filters can adsorb some chemicals but you should not trust a point of use filter to solve contamination of this type without lab evidence and expert guidance. In these cases, a temporary safe water supply is the path while testing and remediation plans are made.
Retesting and results
If your first bacterial test fails, repeat shock chlorination and flushing. Consider hiring a licensed well professional to inspect and disinfect. Some contamination events are stubborn. A cracked casing or failed cap can allow repeated intrusion. Surface drainage around the well pad may need improvement. A well contractor can assess these issues. The CDC recommends a contractor for submerged or damaged wells due to safety and technical challenges. See the CDC emergency well page for that recommendation.
If your first test passes, plan to test again after one to two weeks, especially after a severe flood. Use the same sterile bottle method and cold chain. Keep a record of both results. Keep an eye on taste and odor. If odor returns, stop using the water and call your health department for advice.
If a chemical test detects VOCs or other hazardous compounds, do not use the water. Work with your health or environmental agency to decide on the next steps. Options may include extended flushing, a source investigation, or treatment solutions such as certified whole house carbon with prefiltration. These are project level decisions that call for professional input.
When to call a professional
Call a licensed well driller or pump contractor if the wellhead was submerged at any point. Call if the casing or cap is damaged or if you see exposed wiring. Call if you smell fuel or chemical odors, or if you see an oil sheen. Call if the water is persistently cloudy after flushing. Call if pressure does not return or the pump short cycles. The CDC notes that wells with submerged or damaged heads should be disinfected by a contractor due to hazards after disasters. Review that point on the CDC page linked earlier.
If your home has interior water damage, call a restoration team at once. Drying the structure quickly protects floors, walls, and the HVAC system. We can coordinate with your testing schedule and keep you informed about what to expect while the well is offline. Tap our water damage restoration and cleanup crew or request storm damage and flood recovery support. For more homeowner guides, scan our disaster recovery resources.
Homeowner checklist
Use this quick plan to keep your family safe while you work through testing and disinfection.
Switch to a safe water source at once. Bottled water is best for drinking, cooking, ice, and dental care. The CDC states not to drink well water after a flood until testing confirms it is safe. That quote and guidance are available at the CDC emergency well page linked above.
Inspect the well area from the surface. Stop if you see damage or exposed wiring. Call a licensed well contractor. CDC guidance advises a professional for submerged or damaged wells.
If the well appears intact and you want to try a do it yourself approach, pump and flush the well to clear floodwater. Direct discharge away from septic and waterways. Then perform shock chlorination as shown by ACES and UF IFAS. Recirculate the chlorine solution. Run taps until you smell chlorine. Wait eight to twenty four hours. Flush until the odor is gone. Then collect a lab sample. Extension resources detail this sequence. Those pages are linked earlier in this article.
Use a state certified lab for testing. Order total coliforms and E. coli, nitrate, pH, and total dissolved solids. Add VOC screening if fuel or chemical exposure is possible. CDC and EPA recommend these tests after flooding in private wells. Read both at the CDC testing page and EPA private wells page shared earlier.
Collect samples in sterile bottles from the lab. Keep them cold at four to ten degrees Celsius. Deliver within the hold time, often within twenty four to thirty hours. State lab pages confirm those handling requirements.
Re test one to two weeks after a passing result to confirm stability. If you still see bacteria, repeat disinfection or call a pro.
FAQs
How soon after a flood can I test
As soon as you can collect a sample safely. Do not drink the water until a certified lab reports it safe. If the well was submerged, contact your health department. CDC gives this advice on its emergency well page at cdc.gov.
How long does shock chlorination take
Most jobs take one to two days. The process includes mixing and recirculation, waiting eight to twenty four hours for contact, and then flushing. Add time for lab results. ACES and UF IFAS describe this schedule at the links listed above.
Can I rely on boiling after a flood
Boiling can make microbially contaminated water safer for drinking if no chemical odor is present. It does not remove chemicals such as fuel or pesticides. Use bottled water if you suspect chemicals. CDC gives that warning at the emergency well page linked above.
Which faucet should I use for a bacteria sample
Use a cold water tap without an aerator or screen. A utility sink or an outdoor spigot that feeds from the main line is a good choice. Run the tap to purge the line before sampling. Use only the sterile bottle from the lab.
Do I need to disinfect my water softener
Yes. Bypass the softener during shock chlorination. Follow the maker instructions for sanitizing the softener and any filters before putting them back in service. Some cartridges need replacement after a flood event.
What do my lab results mean
A result that shows any E. coli indicates fecal contamination and a serious health risk. Do not drink the water. Disinfect and retest. Coliform presence also indicates a breach. Nitrate above the drinking water standard is unsafe, especially for infants. Your health department and lab can review results and next steps with you.
Key facts with sources
Do not drink well water after a flood until testing confirms it is safe. Use bottled water. Source: CDC How to Disinfect Wells After an Emergency at cdc.gov.
If the wellhead was submerged or the system is damaged, hire a well or pump contractor for disinfection and repairs. Work on wells after disasters can be hazardous. Source: CDC page linked above.
At minimum order total coliforms, E. coli, nitrate, pH, and total dissolved solids from a state certified lab. Consider VOC testing when fuel or chemical exposure is possible. Source: CDC testing guidance at cdc.gov.
Shock chlorination commonly involves recirculating chlorine through the well, running chlorinated water at each tap until a chlorine odor is present, waiting eight to twenty four hours, and flushing until the odor is gone before testing. Sources: Alabama Cooperative Extension and UF IFAS at aces.edu and edis.ifas.ufl.edu.
Bacterial samples must be collected in sterile lab bottles and delivered within the lab hold time while kept cold between four and ten degrees Celsius. Sources: CDPHE and Penn State lab instructions at cdphe.colorado.gov and agsci.psu.edu.
How we can help
As a restoration company, our focus is fast response and clear communication. We coordinate with your lab testing plan so your home stays safe while the well is offline. We set up clean areas for food prep using bottled water. We isolate impacted rooms. We dry the structure and remove debris with care. If your well needs a contractor, we can introduce you to local licensed pros while we handle the water cleanup.
If you need help right now, call us for water damage restoration and cleanup or request storm damage and flood recovery. For more homeowner guides and checklists, browse our disaster recovery resources.
Sources
CDC How to Disinfect Wells After an Emergency
CDC Disinfecting Wells After a Disaster
EPA Private Wells Protect Your Home Water
Alabama Cooperative Extension Flooded Wells Shock Chlorination
UF IFAS Private Wells 101 Bacterial Contamination and Shock Chlorination
Colorado CDPHE Collecting Water Samples
Penn State AASL How to Collect a Water Sample
Use the steps above to protect your family and your plumbing. Start with safe temporary water. Check the well for damage. Pump and flush a flooded well. Disinfect with a measured dose. Flush the home lines. Test with a certified lab. Retest to confirm a clean result. Call a well contractor or your health department whenever you see damage, chemical odor, or stubborn contamination.