
Your basement smells like a wet gym sock that retired there. You look everywhere and see nothing: no fuzzy walls, no black rings, no green anything. So why the musty odor? Simple. Moisture got sneaky. Mold only needs water, a food source like dust or paper, and time. Odor can show up before you spot a single speck. The fix is not gutting your basement just to hunt ghosts. Map the moisture first, dry with precision, then remediate only where it counts. That is moisture mapping, and it is the fastest way to stop the stink without turning your weekend into demolition derby.
When The Nose Knows
Musty odor is your early warning siren. Hidden moisture often collects under flooring, in wall cavities, at cold corners, or in the slab itself. You can miss it during a quick walkthrough because moisture is a ninja. It moves with temperature swings, vapor pressure, and seasonal humidity shifts. The goal is not to panic. The goal is to diagnose with non-destructive checks, then deploy targeted basement dehumidification and surgical remediation. That is how you save drywall, your sanity, and your budget.
There is strong science behind this approach. The EPA notes that hidden mold loves spaces like behind drywall and under carpets, and that moisture meters and thermal cameras help locate moisture before it becomes a visible mess. You can see that guidance in the EPA Mold Course, Chapter 3, which is a solid primer on finding hidden moisture and mold sources.
Try Moisture Mapping First
Moisture mapping is a fancy name for “figure out where the wet spots are, why they exist, and how hard they are trying to come back.” Instead of ripping into walls at random, you create a map of humidity, temperature, and moisture readings across your basement. You do this at floor level, mid-wall, high-wall, near exterior walls, on and off cold-water lines, across the slab, and under suspicious corners. If a reading spikes relative to the rest of the space, you have a lead. You repeat this over a couple of days and a couple of different weather patterns if possible. Patterns tell stories: condensation on cold walls, slab vapor emissions, a pinhole plumbing leak, or a flashing failure feeding one corner every time it rains.
Moisture mapping is especially useful in finished basements where you want zero unnecessary demolition. It lets you confirm whether you are dealing with condensation physics or true water intrusion before you grab a pry bar. With a decent hygrometer, a thermal camera or even an IR temperature gun, and a moisture meter, you can get 80 percent of the answers you need with 0 percent of the drywall dust.
Non-Destructive Checks That Work
Start with relative humidity checks. Place inexpensive hygrometers in different zones: center of the room, near exterior walls, near a sump or floor drain, behind storage shelves, and inside closets. If one zone runs 5 to 10 percent RH higher than the others, flag it for deeper checks. The Basement Health Association recommends keeping indoor humidity below 60 percent RH, ideally in the 30 to 50 percent range. For basements, 40 to 50 percent is a solid target because it is high enough to avoid over-drying finishes but low enough to shut down most mold growth.
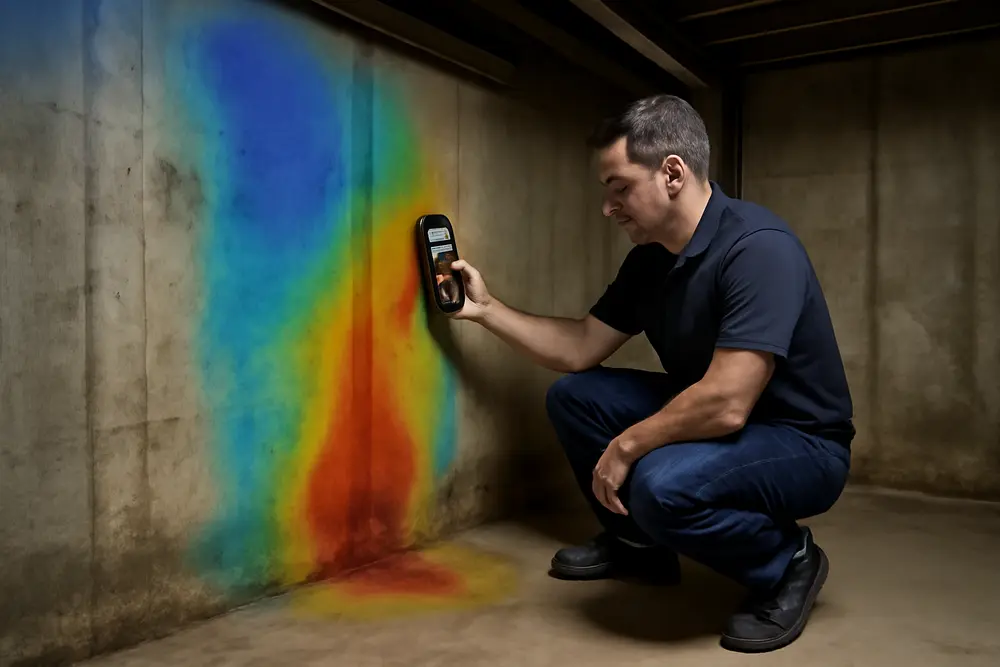
Scan for cold spots. Use a thermal camera or a simple infrared thermometer to detect surfaces that are cooler than the surrounding air. Cold drywall sections over rim joists, bare concrete walls, metal ductwork, and uninsulated plumbing can drop below the dew point, which means ambient moisture will condense on those surfaces. If a surface temperature is at or below the current indoor dew point, it can sweat even if you never see droplets. That micro-condensation is more than enough to feed odor and sub-surface growth.
Test the slab. Tape a 2-foot-by-2-foot piece of clear plastic tightly on the concrete for 24 to 48 hours. If you see condensation on the underside of the plastic or darkening of the slab, you have upward moisture vapor emissions. That does not mean your basement is flooding. It does mean the slab is breathing moisture from the soil into the space. Professional tests go deeper, including in-slab RH probes and calcium chloride tests, but the plastic-sheet test is a quick, non-destructive indicator for homeowners.
Check for vapor drive. Compare outdoor conditions to indoor conditions. When warm, humid outdoor air meets cool basement surfaces, moisture moves from the outside to the inside. Ventilating with outdoor air on a muggy day will make a basement wetter. A quick rule: do not open the basement windows for “fresh air” in summer if the outdoor dew point is above roughly 55 degrees Fahrenheit or outdoor RH is higher than indoor RH. You will just gift-wrap condensation to every cool surface in the room.
Spot slow leaks. Watch for steady, localized humidity spikes near bathrooms, laundry, or wet bars. Run fixtures and check supply lines, traps, and shut-offs. If you suspect a wall cavity issue, a borescope through a small inspection hole behind a baseboard gives you a peek without gutting the wall. A pin-type moisture meter can also confirm whether drywall or baseboards are above target moisture content compared to other walls in the same room.
Where Moisture Hides
Moisture troublemakers in basements like to play hide-and-seek with a few predictable patterns. Cold concrete and masonry make excellent condensation targets. Any exposed concrete wall or slab that is colder than room air can condense moisture. That moisture often wicks into baseboards and bottom drywall edges, feeding odor where you will not see it until it gets bold.
Slab emissions are another favorite. Even without liquid water intrusion, a slab can release water vapor year-round. If you installed vinyl plank, carpet, or foam underlayment without a proper vapor retarder, that moisture can get trapped beneath and warm up to create a private spa for musty odors. Floors can feel fine to the touch, but the microclimate under them is a different world.
Vapor pressure differences cause moisture to choose paths you would not expect. Think of moisture like it is lazy and takes the easiest pressure gradient. Cracks at the cove joint where wall meets slab, hairline shrinkage cracks, and gaps around utility penetrations all act like on-ramps for vapor or short-lived water intrusion during storms. If gutters dump water next to the foundation or the yard slopes toward the house, that gradient just got a turbo boost.
Plumbing oddities round it out. A weeping shut-off valve, a dishwasher supply line upstairs, or a pinhole leak in a copper line that runs overhead can drip slowly enough to dry on its way down while still elevating humidity in a single corner. That is why mapping is so helpful. You are not guessing. You are proving.
Dry Smart With Dehumidification
Once you have a moisture map, aim your drying at the real culprits. Basement dehumidification is your workhorse. You want a unit sized to your square footage and your moisture load. Look for a built-in humidistat so you can set a target of 40 to 50 percent RH and let the machine pace itself. Continuous drainage or a condensate pump matters, because nobody wants to babysit a bucket. If your basement regularly sits below 60 degrees Fahrenheit, pick a low-temperature rated refrigerant unit or consider a desiccant dehumidifier designed for cool spaces.
Placement is not random. Park the dehumidifier where the readings were highest or where airflow can sweep through those zones. Leave a couple of feet of clearance around the unit. If one corner was the moisture magnet, set a small fan to move air across that wall toward the dehumidifier intake. Airflow should be steady and gentle. Think slow cooker, not flamethrower.
Seal the envelope during drying. Keep doors and windows closed unless you know the outdoor air is drier than the indoor air. Bringing in humid summer air will stall or reverse drying. In shoulder seasons, you can sometimes use outside air strategically, but only if you check dew points or see that outdoor RH is clearly lower.
Drying walls and floors without demolition is doable when you act early. Pull furniture a few inches off exterior walls. Lift rugs and get them out of the room. If you suspect damp baseboards, carefully pop a piece to inspect and allow air under the base. For minor damp drywall, indirect airflow and dehumidification often handle it within 24 to 72 hours. If materials stay wet beyond 48 hours, that is when you pivot to small-scale remediation procedures.
A quick word on capacity. Manufacturers list pints per day, but the real-world number depends on temperature and how wet the space starts. Big basements or high loads often need 50 to 70 pints per day or more. If one unit runs nonstop and still cannot reach your setpoint, you either undersized the unit, have fresh moisture intrusion, or both. Fix the source and upsize as needed.
Best Option Restoration uses commercial-grade dehumidifiers with smart sensors on water damage jobs because precision matters. Less guesswork means less demolition. If you want a professional moisture analysis or rental-grade equipment set with monitoring, reach out to Best Option Restoration of Travis County. We can size the equipment to your space, place it for efficiency, and monitor the drying curve so you are not just hoping the smell fades.
Remediation That Works
Remediation should match what your moisture mapping found. If you uncovered small, localized mold growth, EPA guidance generally allows homeowners to handle areas smaller than about 10 square feet with proper precautions. Wear gloves, eye protection, and at least an N95 respirator. Isolate the area from the rest of the home by closing doors, and avoid running fans that blow spores into other rooms. HEPA vacuum loose debris, then clean non-porous surfaces with a detergent solution. Porous materials that were wet long enough to smell funky, like carpet padding or unsealed baseboards, are often better off replaced. Do not mix bleach with other cleaners. When you bag debris, carry it out gently to avoid aerosolizing dust.
If your slab emits moisture, address it at the source. You can apply an appropriate slab vapor barrier coating or epoxy system rated for vapor pressure, then reinstall flooring designed to breathe. If you prefer carpet, consider breathable cushion systems and avoid rubber-backed rugs. If you want floating vinyl plank, pick products and underlayments that are compatible with concrete subfloors and vapor-raised environments. Always follow the flooring manufacturer’s moisture limits and testing requirements. If you are at or above those limits, do not install until you address emissions.
Insulate cold surfaces that repeatedly test below dew point. For rim joists and foundation walls, rigid foam insulation products with sealed seams can raise the interior surface temperature and reduce condensation risk. Avoid trapping moisture by following your local building codes and assembly best practices for your climate zone. In many climates, you want a foam layer against concrete, not fiberglass batts alone, and you want to avoid interior poly sheeting that can trap vapor. The goal is warmer interior surfaces and controlled drying paths, not plastic-wrapped walls that sweat behind the scenes.
Seal the easy leaks. Recaulk at the cove joint with appropriate sealants, fill hairline cracks if they are a vapor path, and cap obvious air leaks around utility penetrations. Outside, extend downspouts 6 to 10 feet from the foundation, clean gutters, and regrade soil so it sheds water away from the house. These are low-glam fixes that pay off fast.
When things are bigger than you expected – heavy odors, past flooding, persistent high RH even with strong dehumidification, or visible mold larger than a bath towel – pause and call in pros. Best Option Restoration builds custom remediation plans that stop regrowth by eliminating moisture sources first. That is the only plan that actually sticks.
Monitor And Prevent
Once you have dried and remediated, keep an eye on things. Place one or two smart RH sensors in the basement that log data over time. Set alerts at 55 percent RH so you get a nudge before odors return. Basements change with seasons. You might need less dehumidification in winter and more as spring turns to summer.
Simple routine checks go a long way. Look for damp corners after storms. Test the dehumidifier pump line every month. Clean filters so airflow stays strong. Store cardboard off the floor on wire racks. Avoid parking wet gear like snow shovels or soaked swimsuits in the basement. If you have a sump, keep the pit covered and the check valve quiet so it is not sharing humidity with the room.
Your target is steady humidity, healthy airflow, and warm-enough interior surfaces. Keep RH roughly 40 to 50 percent most of the year. The Basement Health Association frames the ideal indoor range as 30 to 50 percent, and anything above 60 percent is asking for trouble. A small, steady correction is better than heroic weekend drying sessions. Let the equipment handle it while you do literally anything else.
Tools That Make It Easier
You do not need a truck full of gadgets to moisture-map a basement, but a few simple tools earn their keep fast. A digital hygrometer with memory gives you RH and temperature history so you can see if nights are the problem or if every rainstorm triggers a rise. An IR thermometer or a thermal camera finds cold surfaces in seconds, and that is half the condensation battle. A pin-type moisture meter checks whether that one baseboard is wetter than its neighbors. Clear plastic and painter’s tape create a zero-cost slab test. If you want to peek inside a wall cavity without a remodel, a basic borescope and a tiny inspection hole behind a removable baseboard trim let you see what your nose has been telling you.
If shopping for a dehumidifier, look for features that prevent bad surprises. Low-temperature operation keeps the coil from icing when the basement gets cool. Auto defrost and a continuous drain option mean it can run unattended. A built-in humidistat lets you aim at 45 percent and forget it. If the unit includes a condensate pump, you can drain up and out to a sink or utility line instead of relying on gravity. Multiple speed settings help you balance noise and performance. Size the unit for your basement footprint and the known moisture load. If you are constantly doing laundry or have a utility sink, consider stepping up a size.
Want help choosing and placing gear so you hit the right targets the first time? Schedule a professional moisture assessment with Best Option Restoration. Our team uses pro-grade meters, thermal imaging, and drying equipment to close the case on stubborn odors without demolition you do not need.
FAQ: Musty Basement Odors
Why does my basement smell musty if I cannot see mold?
Odor often shows up before visible growth. Hidden moisture in slabs, behind baseboards, or at cold surfaces can feed microscopic growth that releases smell without obvious stains. Moisture mapping exposes those zones so you can dry them out.
What RH should I keep in my basement?
Target roughly 40 to 50 percent RH. Keep it below 60 percent to discourage mold. The 30 to 50 percent range cited by the Basement Health Association is a good general indoor target.
Is it safe to open windows to air things out?
Only if the outdoor air is drier than the indoor air. On muggy days, outside air will add moisture and make condensation worse. If the outdoor dew point is above about 55 degrees Fahrenheit, keep the basement closed and let the dehumidifier work.
Do I need to tear out drywall to find moisture?
Not usually. Start with non-destructive checks: RH mapping, cold-spot scans, moisture meters, and a slab test. If you need to see a cavity, a small inspection hole with a borescope behind a baseboard beats removing whole sheets of drywall.
What kind of dehumidifier works best for basements?
Choose a unit sized for your square footage and moisture load, with a built-in humidistat, low-temperature operation, and continuous drain or a pump. If your basement is cool most of the time, pick a low-temp rated refrigerant unit or consider a desiccant model.
When should I call a professional?
Call in help if you have persistent odors after drying, visible mold larger than about 10 square feet, a history of flooding, or moisture readings that keep climbing. Also call a pro if you suspect sewage, structural issues, or materials like asbestos or lead that require special handling.
Put Moisture Mapping To Work
If your nose says musty but your eyes see nothing, trust the data and map the moisture. Start with RH sensors, scan for cold spots, test the slab, and watch how the space behaves after rain or on humid days. Aim your basement dehumidification at the mapped hotspots and use gentle airflow to move moisture toward the unit. Remediate only what proves wet or affected, then lock in the win with outdoor drainage fixes and insulation where surfaces run cold. That is how you eliminate odors without tearing the place apart.
If you want a hand, Best Option Restoration offers moisture mapping, targeted drying, and water damage restoration using advanced equipment that dries materials fast with minimal demolition. If your checks turn up mold or you want an expert remediation plan that prevents regrowth, our mold clean up services are built around stopping moisture at the source and restoring healthy air. Hidden moisture picked this fight. We will finish it.
Sources worth bookmarking: the EPA’s Mold Course, Chapter 3 for hidden mold basics, the Basement Health Association’s moisture control guidance on ideal humidity and drying timelines, and a practical basement dehumidification guide covering setpoints, sizing, and features to look for.