
You kicked mold out. Now keep it from crashing the housewarming. The trick is not just replacing soggy stuff with fresh stuff. It’s choosing layers that refuse to feed mold, placing vapor control in the right spot for Austin’s hot-humid climate, and adding smart ventilation that actually moves moisture out instead of letting it camp inside your walls. Here’s how Best Option Restoration of Travis County rebuilds so mold doesn’t get a sequel.
Why Mold Comes Back
Mold is a simple beast with three needs: moisture, a food source, and time. Standard paper-faced drywall, fluffy insulation with air leaks, and paint that traps vapor give mold exactly that. If you rebuild with the same stack but prettier finishes, you’re basically setting mold’s table again. Break the cycle by reducing moisture, removing the buffet, and letting assemblies dry in the direction your climate supports.
Best Wall Boards For A Rebuild
Not all drywall is created equal. In fact, not all of it is even drywall. The goal is to remove paper food sources and pick panels that can shrug off humidity without turning musty. Here are the heavy hitters and when to use them.
| Material | What It Does Well | Best Use Areas |
|---|---|---|
| Moisture- or Mold-Resistant Drywall (green or purple) | Paper-faced gypsum with moisture repellents that slow surface mold; more tolerant of humidity than standard gypsum | Bathrooms outside shower/tub zones, laundry rooms, kitchens, basements away from direct water |
| Fiberglass Mat-Faced Panels | No paper facing, so nothing tasty for mold; handles intermittent moisture better than standard paper-faced boards | High humidity zones, areas behind tile outside direct spray, utility rooms |
| Cement Board or Fiber Cement | Inorganic and very moisture-tolerant; ideal backer for tile where water hits | Showers, tub surrounds, backsplash and splash zones |
| Magnesium Oxide (MgO) Board | Inorganic, resists mold and moisture very well with strong fire resistance | Basements, wet walls, exterior sheathing interfaces, damp-prone spaces |
Two quick realities. First, green and purple boards are moisture-resistant, not waterproof. They are not a substitute for proper shower backer. Second, fiberglass mat panels and MgO remove the paper snacks mold loves, which is a huge step up when paired with good ventilation and vapor control.
Where Each Panel Belongs
Bathrooms and laundry rooms do great with mold-resistant drywall on walls and ceilings, then cement board anywhere you plan to tile that can get direct spray. Kitchens love fiberglass mat-faced panels behind backsplashes and around sinks where splashes happen. Basements and damp-prone walls benefit from MgO or fiberglass mat-faced boards, especially on exterior walls. If you’re finishing a garage or utility space that bakes in summer humidity, fiberglass mat panels tolerate the swings better than paper-faced gypsum.
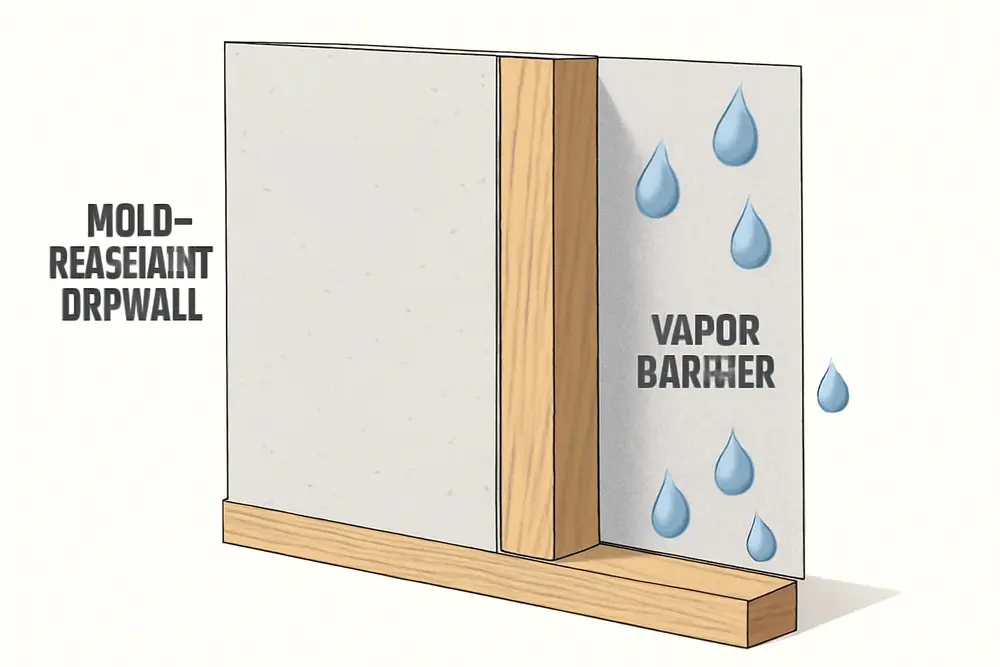
Vapor Barriers Explained
Vapor control materials are sorted by how easily water vapor can pass through them. In code-speak, Class I is a true vapor barrier like polyethylene or foil, Class II is a tight vapor retarder like kraft-faced insulation and some coatings, and Class III is more vapor open like certain paints or smart membranes at higher humidity. The right choice and location depend on climate.
Austin sits in a hot-humid climate. Most of the year, warm wet air is outside, cooler drier air is inside, and that pressure wants to push moisture inward. That means two big rules. One, you usually do not put a Class I interior vapor barrier on your walls, because it can trap moisture in the assembly. Two, you focus on airtightness, drainage, and assemblies that can dry to the interior. Exterior-applied vapor retarders or foam sheathing can help control inward vapor drive from rain-soaked cladding and summer humidity, while interior surfaces stay more vapor open so walls can breathe inside when needed.
There are exceptions by assembly type. Crawl spaces need a ground vapor barrier regardless of climate. Certain roofs may need a specific retarder class to avoid condensation. And local code calls the shots. As a general reference, the International Residential Code requires interior Class I or II vapor retarders for walls in colder zones, not in Austin’s zone. Crawl spaces with exposed earth need a continuous ground cover that qualifies as a Class I vapor barrier. Always confirm the current local amendments before you build.
Smart Vapor Barrier Installation
Even excellent materials fail if the install is sloppy. Vapor barrier installation is all about continuity. You want one continuous plane of control, sealed at seams and penetrations, with a priority on air sealing so humid air cannot hitch a ride through gaps.
On crawl spaces, use a heavy ground barrier and run it up the foundation wall, then fasten and seal. Overlap seams generously and tape them with compatible tape, not generic duct tape. Seal around piers with boots or careful cuts plus sealant. If you encapsulate the crawl, close wall vents, add dehumidification or conditioned supply per design, and make sure your plumber and electrician do not Swiss-cheese the membrane without sealing their cuts.
On slab-on-grade projects, any new slab should sit over a properly rated vapor barrier under the concrete. If your existing slab did not get one, plan for a surface-applied moisture mitigation system before you glue down any fancy floors. Underlayments, adhesives, and flooring all have moisture emission limits. Respect them or watch your floors curl.
On walls and ceilings, avoid the double barrier trap. If you install foil-backed foam outside and a Class I poly inside, moisture can wind up stranded in the middle with no drying path. In Austin, a better route is exterior foam or a vented rainscreen to control wetting from outside, plus an interior that is more vapor open but very airtight. A variable-perm smart retarder on the interior can be a good middle path in assemblies that need some winter protection while still allowing inward drying during humid months.
Every penetration counts. Gaskets at electrical boxes, sealant around plumbing stub-outs, taped seams at membranes, and good transitions at windows and sole plates all matter. Air leaks move far more moisture than vapor diffusion. Stop the air, and you cut mold’s favorite delivery service.
Insulation And Air Sealing That Help
Insulation choice is not just about R-value. It affects moisture, drying, and whether mold gets a comfy couch. Closed-cell spray foam is an air barrier and a Class II or Class I vapor retarder at typical thickness, which can be helpful on roof decks and tricky rim joists. If you need assemblies to dry inward, keep thicknesses and locations strategic, or pair foam with materials that allow drying on one side. Open-cell foam is air tight but vapor open, so in Austin it needs thoughtful pairing to avoid moisture loading in roof sheathing. Mineral wool resists water absorption, does not feed mold, and pairs well with an interior smart retarder. Rigid foam on the exterior warms the sheathing, controls vapor drive from rain-wet cladding, and can reduce condensation risk. The key is continuity of air control. Spray foam at top plates and penetrations, gaskets at drywall-to-framing joints, and taped sheathing seams all stack the odds in your favor.
Floors, Paints, And Trim Upgrades
Floors see spills, cleaning water, and humidity rising from slabs. Porcelain or ceramic tile shines in wet rooms. Luxury vinyl plank and tile can be good in living areas if you choose versions rated for high moisture and use the right underlayment. Glue-down products need adhesives approved for your slab’s moisture emission and alkalinity. Sealed concrete can be gorgeous and low risk with a breathable sealer. Wall-to-wall carpet in basements or any space with past water issues is basically an all-you-can-eat buffet for mold, so limit it to dry upper floors if you must have it.
For paints, use high quality, low-VOC coatings with mold-inhibiting additives where manufacturer-approved. In baths and laundry rooms, satin or semi-gloss resists condensation and wipes clean. Prime repairs properly and avoid painting over damp surfaces. If you are painting new fiberglass mat-faced boards, follow the exact primer spec on the data sheet. It keeps finishes from blotching and helps them last.
Trim deserves an upgrade too. PVC or composite baseboards, or a tile base in bathrooms, will not wick moisture the way MDF does. Keep baseboards just off the floor with a small gap and flexible sealant so the finish does not suck up mop water. Solid-surface or composite window stools beat raw wood around condensation-prone windows.
Ventilation And Dehumidification
Ventilation is the unsung hero that actually exports moisture instead of letting it soak into your walls. Bathroom fans should move real air to the exterior, not into the attic. A good rule of thumb is about 50 CFM intermittent or 20 CFM continuous per bath, with more for big showers. Kitchens should exhaust to the exterior as well. Recirculating microwave hoods mostly freshen your feelings, not your air. Run fans during showers and 20 minutes after. Humidity-sensing controls make this automatic so teenagers cannot forget.
Your HVAC system should help, not hurt. Oversized systems short-cycle and never wring out humidity. Aim for equipment sized by load calculation, not guesswork. In Austin, consider a whole-home dehumidifier integrated with your ductwork to keep indoor relative humidity in the 40 to 50 percent range during sticky months. Use a simple hygrometer and check it periodically. If your home often sits above 55 percent, dehumidification pays for itself in fewer repairs and fewer musty smells.
Attics need balanced intake and exhaust, baffles that keep soffits clear, and bath fans that vent through the roof or wall. Insulation should not block airflow at the eaves. If you are sealing a roof deck with spray foam, follow the prescribed ventilation or unvented assembly details. A semi-conditioned attic with the ducts inside the thermal boundary can be a huge moisture and energy win when done correctly.
Drainage And Exterior Details
If the outside is dumping water at your foundation, mold prevention becomes an uphill sprint. Set the grade so it drops at least about 6 inches within 10 feet from the house. Keep gutters clean and downspouts extended well away, typically 5 to 10 feet, or tie them to a drain line that sends water to daylight. Flashing, kickout details, and properly lapped weather-resistant barriers keep rain from sneaking behind siding. If you irrigate, do not let sprinklers pound the wall cladding every morning, and avoid mulch that stacks up above the sill. Brick needs weep holes clear of debris. Little exterior fixes protect the interior layers from soaking.
Budget Roadmap That Works
You do not need platinum-plated everything. Spend where it blocks moisture first, then on finishes. Prioritize the wettest zones like showers, laundry, and any wall with a history of leaks. Use cement board and quality waterproofing in showers without compromise. Choose fiberglass mat-faced or MgO in known humid utility rooms. In drier rooms, mold-resistant drywall is usually enough, while standard gypsum can still make sense in interior walls that never see moisture if your ventilation is right.
Put real money into vapor barrier installation quality. Thicker ground covers in crawl spaces with properly sealed seams cost more up front but save you from crawlspace fog and buckled floors later. On slabs, spend on moisture mitigation if your tests say you need it. Do not cheap out on tapes, sealants, and terminations. Those rolls and tubes are what keep the control layers continuous.
Smart ventilation upgrades like quiet bath fans with timers, an exterior-vented kitchen hood, and a dedicated dehumidifier often beat the ROI of premium wall boards alone, because they reduce the moisture load across the entire house. Materials cannot fix bad indoor humidity. Tackle both.
Contractor Questions To Ask
Good pros love good questions. Ask which mold-resistant drywall they plan to use in each area and why. Green or purple board has a place, but where are they switching to fiberglass mat-faced, cement board, or MgO? For vapor control, what class of material are they proposing, and where are they locating it in the assembly for a hot-humid climate? Get the perm ratings and product data sheets. Ask how they will seal seams and every penetration, including boxes, pipes, and can lights. Request the specific code sections they are meeting for your zone, including any local amendments. Find out how they handle bath fan ducting and kitchen hood venting to the exterior. Finally, ask about workmanship warranties and what conditions keep them valid, like maintaining gutters or setting fan timers. If a contractor cannot answer clearly, keep shopping.
Austin Climate Notes
Central Texas is a moisture wild card. Summer humidity dumps water vapor against cool interior surfaces, and sudden cold snaps can flip condensation risks. That is why rigid exterior foam, ventilated cladding, or other exterior control layers paired with a more vapor-open interior is often the safer wall recipe here. The International Residential Code generally requires interior Class I or II vapor retarders in colder zones, but Austin is not in that group. Crawl spaces still need a continuous ground barrier, and vented crawls that stay wet deserve an encapsulation strategy and dehumidification plan. Always check current city and county amendments, because inspectors follow those, not what your cousin used in another state.
Common Mistakes To Avoid
Do not stick poly sheeting behind drywall in interior walls just because grandma’s basement had it. In a hot-humid climate, that can trap moisture. Do not vent bath fans into attics or soffits. The moisture you send up there will come back down as stains. Do not lay new vinyl plank over a damp slab without testing. Moisture emission and pH will eat adhesives and swell planks. Do not use MDF base in rooms that get regular mopping or splashes. It drinks first and asks questions later. Do not skip the boring parts like taping sheathing seams, gasketing drywall, and sealing top plates. Air leaks move more water than vapor diffusion, and they are the easiest win to lock down during a rebuild.
FAQ: Quick Answers
Is mold-resistant drywall worth it?
Yes, in humidity-prone rooms it slows mold growth on the surface compared to standard paper-faced gypsum. It still needs proper ventilation and moisture control, and it is not a waterproof layer.
Where should I absolutely not use regular drywall?
Inside showers and tub surrounds. Use cement board or another approved tile backer there, with a waterproofing membrane per manufacturer instructions.
Do I need a vapor barrier on the inside of my walls in Austin?
Usually no. In hot-humid climates, an interior Class I barrier often causes more problems than it solves. Focus on air sealing, drainage, and assemblies that can dry inward, with exterior-applied control layers where needed.
Will paint with mildewcide fix a humidity problem?
No. It can help the surface resist growth, but if moisture is high, mold will find a way. Ventilation and dehumidification are the real fix.
Can I mix material types in one house?
Absolutely. Use higher performance panels in wet rooms and budget-friendly options in dry areas. Just keep the control layers continuous and the ventilation tuned.
Need Pros Who Build Mold-Resistant Assemblies?
If you want a rebuild that is actually tougher than your last one, Best Option Restoration is ready to design and install materials that match Austin’s climate. We specify the right mold-resistant drywall for each room, get vapor barrier installation right the first time, and add the ventilation and dehumidification that keep indoor humidity in check. If you have questions about a wall detail, a product spec, or a code call, we are happy to talk it through and build it right so mold does not get a rerun.