
If your hardwood looks like it’s frowning at you or trying to do a proud little push-up, you’re staring at either cupping or crowning. These two lookalikes are caused by moisture moving in different directions, and the fix depends on reading that moisture flow correctly. Get it wrong and you can trade one problem for a worse one. Get it right and you can save a ton of wood, money, and sanity. Here’s how Best Option Restoration of Travis County approaches wet hardwoods with a cool head, a straight edge, and gear that actually moves moisture in the right direction.
Cupping vs Crowning 101
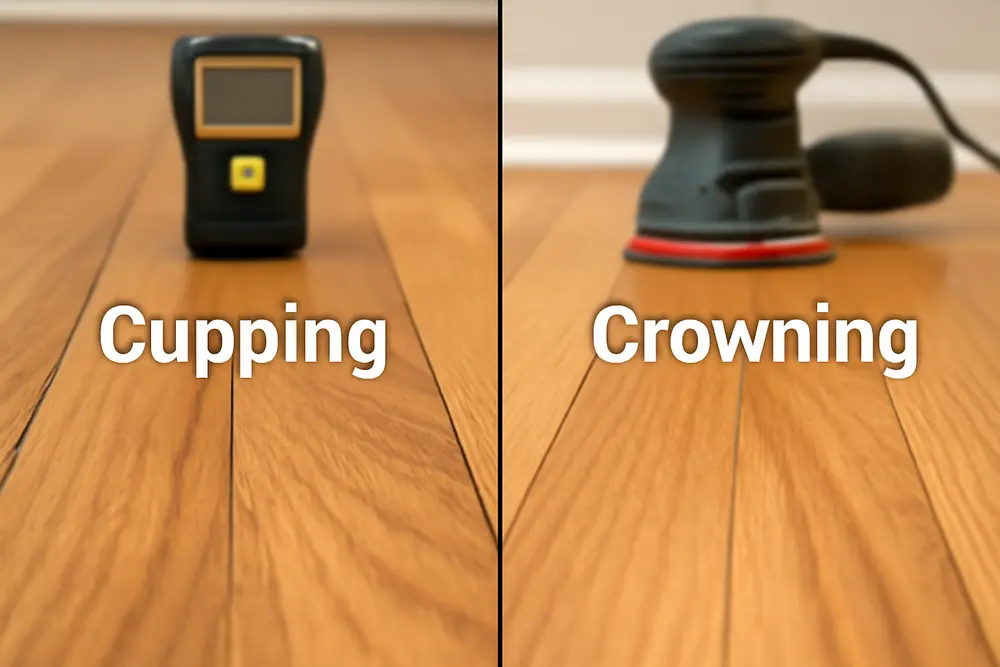
Cupping is when each board is higher at the edges and low in the center. Think tiny canoe. It typically means the bottom of the board took on more moisture than the top, so the underside swelled and the face stayed relatively dry. That moisture imbalance bends the board upward at the sides.
Crowning is the opposite. The board is puffed up in the middle and lower at the edges. It usually comes from top-down wetting such as a spill that sat too long, or from sanding cupped wood before it fully dried and flattened. Sanding a still-cupped surface makes it flat that day, but when the board finally relaxes, the center ends up high and you get a permanent crown.
If your eyes are second-guessing themselves, use a straight edge across several boards. If the straight edge touches the edges with a gap under the middle, that’s cupping. If it touches the middle with daylight at the edges, that’s crowning. This fast field check beats arguing with shadows.
Why Timing And Moisture Matter
Wood swells across its width when it gains moisture and shrinks when it loses it. The direction of the moisture change is the whole story. When the subfloor or slab is wet, or a crawlspace is humid, moisture pushes up into the underside of your boards and creates hardwood floor cupping. When the top of the boards is exposed to standing water or high room humidity, the face can swell first, or the top can dry too fast while the bottom is still wet, which sets you up for hardwood floor crowning later.
This is why dry-first and sand-later is the golden rule. Sanding controls shape only when moisture is balanced through the board’s thickness. Sand too early and you’ll remove material you need when the board flattens. Translation: you can turn a salvageable floor into a crown you cannot sand out without over-thinning the wear layer.
Read Moisture Direction
Guessing is for coin flips. A restoration plan deserves actual measurements.
Start with a visual check. Note where water ran, where it sat, and where it wicked under baseboards. Lift a register or a threshold strip if you can do it without damage. Look for darkened subfloor, damp felt or foam underlayment, or condensation on a slab.
Use a quality moisture meter. Pin meters let you read deeper by measuring resistance between pins. Pinless meters are fast for scanning large areas. The key is comparing readings top-to-bottom and room-to-room. If you can, check the underside of loose boards, exposed edges, or an adjacent closet where you can pull a board cleanly. Higher readings on the bottom than the top point to cupping in progress. Higher on the top than the bottom suggests top-wetting or post-sanding crowning risk.
Do not forget the subfloor. On plywood, check multiple plys if possible. On slabs, test for vapor transmission and look for higher readings or cool-to-the-touch areas that do not match the thermostat setting. Crawlspace present? That humid box is a usual suspect when there is no obvious spill above.
Log your readings and map the pattern. Moisture rarely distributes evenly. The wettest zone tells you where to focus your drying and how aggressively to protect the finish elsewhere.
Targeted Drying That Works
Every good plan starts with stopping the water. Fix the leak, drain the standing water, and correct humidity. Drying a floor while water is still sneaking in is like bailing a boat with a shot glass.
For hardwood floor cupping, target the bottom first. Use floor-drying mats or an injection system to move air under boards when possible. Pair that with low-grain dehumidifiers so you are not just pushing wet air around. If you only hammer the top with air movers while the bottom stays wet, you make the moisture imbalance worse and raise the chance of future crowning.
For top-wet situations moving toward crowning, remove surface water fast, control room humidity, and begin balanced airflow. If the subfloor is not wet, the emphasis is on face drying while preventing the top from racing ahead of the bottom. Finishes slow evaporation, so be patient. Oil-based finishes usually slow vapor more than water-based, but both act like a raincoat that still lets a little sweat through.
Keep the environment predictable. A stable temperature and indoor relative humidity near 35 to 50 percent helps the wood return to its normal moisture content without shock. Slamming the heat or using space heaters can overdry the surface and crack finish, while also warping boards. Let quality dehumidifiers, well-placed air movers, and time do the heavy lifting.
Plan for a stabilization period after the obvious wetness is gone and equipment is removed. Two to four weeks is common, but species, thickness, and finish can stretch that timeline. Keep checking moisture. You want readings that no longer drift and are close to the expected normal for your home. In Central Texas homes that run air conditioning most of the year, many floors live happily near 6 to 9 percent moisture content, but your exact number depends on HVAC habits and season.
Finish And Sanding Mistakes To Avoid
Sanding too soon is the classic own-goal. If the boards are still cupped and the moisture content is not uniform, the sander will flatten the high edges by removing face material. When the wood dries and flattens naturally, the center ends up high. That crown will not sand out without shaving the wear layer dangerously thin.
Resist top-only drying. Pointing fans at a glossy floor while the subfloor is still damp can lock in a moisture gradient that keeps the wood stressed. That is how you get persistent micro-cracking in finish and edge lines that telegraph through later coats.
Skip harsh chemicals on stains. Oxalic acid and other treatments have their place for iron stains or tannin bleed, but they are not a cure for shape problems. Fix the moisture first, then deal with discoloration and finish after the wood stabilizes.
Mind engineered floors. They can often be saved, but repeated wetting can weaken glue lines. If the top veneer is thin, aggressive sanding is a bad call. Measure that wear layer before you plan finish repairs.
Sand Or Replace? Use This Field Test
Your decision comes down to three things: moisture is stable, boards are structurally sound, and there is enough wear layer to flatten remaining distortion without getting into tongues or fasteners. Here is a quick way to think through it after drying and stabilization.
| Scenario | What To Try First | When To Replace |
|---|---|---|
| Mild to moderate cupping, moisture source fixed, readings stabilized | Light sanding and refinish after the floor has relaxed as much as it will | If you would need to remove too much thickness to flatten remaining cup |
| Crowning after top-wet event or after premature sanding | Verify uniform moisture, then carefully resand if the wear layer allows | If the crown is high and the wear layer is thin, swap boards |
| Severe damage with crushed fibers, delamination, big gaps, or finish failure | Targeted board replacements, then blend sand and refinish | Replace sections or the whole room if damage is widespread |
How do you gauge wear layer? On solid hardwood, you have room for several sandings across the life of the floor, but tongues should never get exposed. On engineered, that veneer might be 2 to 6 millimeters. Under 2 millimeters, you are in spot-buff and coat territory, not full flattening. If you do not know the floor’s history, pop a grille, look at a threshold, or use a discreet closet board to check thickness.
Compression set is another line in the sand. If boards swelled so much that the fibers crushed against each other, even perfect drying will not always spring them back. You will see tight joints with ridges or edges that never quite relax. At that point, replacing the worst boards saves you from chasing perfection with a sander.
Austin Humidity And Slabs
Central Texas keeps life interesting. We swing from humid Gulf air to dry north winds, and a lot of homes sit on concrete slabs. Slabs that lack a proper vapor retarder or that get seasonal moisture can feed hardwood floor cupping from below even if your living room feels dry. That is why you will sometimes see perfect finish on top and cranky boards underneath.
If your floor is glued to a slab, the adhesive quality matters. Some adhesives are moisture tolerant within a range, but none are magic. If you have a history of musty smells after rain, investigate slab vapor before reinstalling wood. In crawlspace homes, keep vents, ground vapor barriers, and drainage in good order. Wet earth under your floor is a constant cupping invite.
Prevention That Pays Off
Acclimate the wood to the home, not just the jobsite. That means storing new flooring in conditioned space until its moisture content is close to the home’s normal, not whatever the warehouse had that week. Aim for indoor relative humidity that lives near 35 to 50 percent year-round. Your AC does some of that, but a standalone dehumidifier can be the hero in shoulder seasons.
Mind water early. Put leak alarms under sinks, behind refrigerators with ice makers, at water heaters, and near washing machines. Catching a slow drip before it becomes a wet subfloor is the cheapest wood insurance you will ever buy.
Use rugs wisely. Mats at exterior doors cut down on tracked-in moisture, but avoid non-breathable pads that trap vapor. If a rug is glued to the floor by summer sweat, that area is trying to tell you something about humidity.
Keep an inexpensive hygrometer in living areas. If you are seeing 60 percent plus inside for long stretches, adjust HVAC, add dehumidification, or both. Wood likes predictability way more than it likes surprises.
Real-World Fixes We See
A dishwasher hose lets loose for a few hours. The top gets soaked, the subfloor gets damp, and the boards cup within a day. We set drying mats over the wettest run, add dehumidifiers, and direct a gentle cross-breeze. Two weeks later, the cup is mostly gone. After another week of stable readings, a light sand and refinish blends the last of it. No board replacements needed.
A homeowner sands a cupped oak floor three days after a flood because it looked “almost flat.” A month later the middle of each board is high. Moisture is balanced now, but the shape is locked. We measure the remaining wear layer. In the living room there is enough veneer for a careful resand, but the hallway is too thin. We resand the living room and replace a section of the hallway. That saves most of the floor and avoids chasing the crown with a sander until tongues flash.
A slab-on-grade home in Round Rock keeps cupping in late summer without any spills. HVAC is fine, but the slab reads damp along the perimeter. We discover poor drainage and no effective vapor retarder under that section. After exterior drainage repairs and interior dehumidification, the cupping relaxes enough for a screen and recoat. Without solving vapor from below, any cosmetic fix would have failed fast.
When You Need Backup
If the floor still looks like a topographic map after basic drying, or your meter readings tell two different stories on the same board, bring in a pro. Best Option Restoration of Travis County uses drying mats, injection systems, data logging, and real-world thresholds for sanding vs replacement so you are not paying for guesswork. We care about saving wood, not just looking busy with fans.
FAQ
How Long Does It Take Cupped Floors To Flatten?
Light cupping from a small spill can start relaxing in a few days once the source is gone. Floors that picked up moisture from a subfloor or slab usually need equipment for a week or two, followed by another couple of weeks of stabilization. Species, thickness, and finish change the clock. Let the meter, not the calendar, be the decider.
Can I Fix Hardwood Floor Crowning Without Sanding?
If the crown is caused by moisture that is still higher on top, drying can reduce it. If crowning happened because someone sanded a cupped floor too early, drying will not reverse the shape. At that point, you either resand if the wear layer allows or replace the worst boards.
Is Engineered Wood Safer Against Cupping?
Engineered wood handles humidity swings better because its layers are crossed, but it is not invincible. A wet slab, a saturated underlayment, or repeated spills can still cause face distortion or delamination. The thinner the top veneer, the less room you have to correct shape by sanding.
What Moisture Content Is “Safe” For Sanding?
There is no single perfect number, but you want the floor back near its normal living range and, just as critical, uniform through the thickness. If the top and bottom are within a tight margin of each other and readings have been stable for days, you are in the zone. If the bottom is still notably wetter than the top, wait.
Will Dehumidifiers Damage My Finish?
Dehumidifiers lower room humidity, which helps wood release moisture. That does not harm finish by itself. Problems come from blasting hot air across a glossy face while the bottom stays wet or from rapid swings in temperature and humidity. Use balanced airflow and control the whole space, not just the shiny surface.
Can I Replace A Few Boards Or Do I Need The Whole Room?
Targeted board replacement works if the pattern and species are still available, and if the rest of the floor is sound. We feather new boards into the pattern, then sand and refinish to blend. If damage is widespread or the floor has been sanded to a thin layer already, a larger replacement might be the smarter long-term play.
If you want help reading moisture direction, setting up targeted floor drying, and deciding if sanding or board replacement is the safer call, call Best Option Restoration of Travis County. We will bring the meters, the mats, and the patience it takes to fix hardwood floor cupping and hardwood floor crowning the right way the first time.