

Wind can turn a normal rainstorm into a sprinkler with an attitude. That sideways blast pushes water under shingles, behind siding, and straight into places your home swore were off limits. If you only see stains or musty smells after a windy storm, that is a classic sign of wind-driven rain damage. This quick homeowner guide shows you where intrusive storm water usually sneaks in, how to handle the first 48 hours so mold does not throw a party, and the smartest hidden leak detection tactics to catch trouble early behind siding, around windows and doors, and in the attic.
What Is Wind-Driven Rain?
Regular rain falls down. Wind-driven rain behaves like a tactical infiltrator. Gusts force water up, sideways, and even backward into tiny gaps that never see moisture during a calm shower. That is why you can have a bone-dry ceiling all year and then get stains or drips only when the wind howls. The stakes are real: water can soak insulation, wick through framing, rot sheathing, short out electrical, and fuel mold growth in as little as 24 to 48 hours. If you act fast, you can dry it out, document it for insurance, and stop a small problem from turning into a gut-the-drywall situation.
Where Does Water Sneak In?
Wind does two things well: it pressurizes the wet side of your home and depressurizes the dry side, basically pulling water through weak links. The usual suspects are not glamorous, but they are consistent.
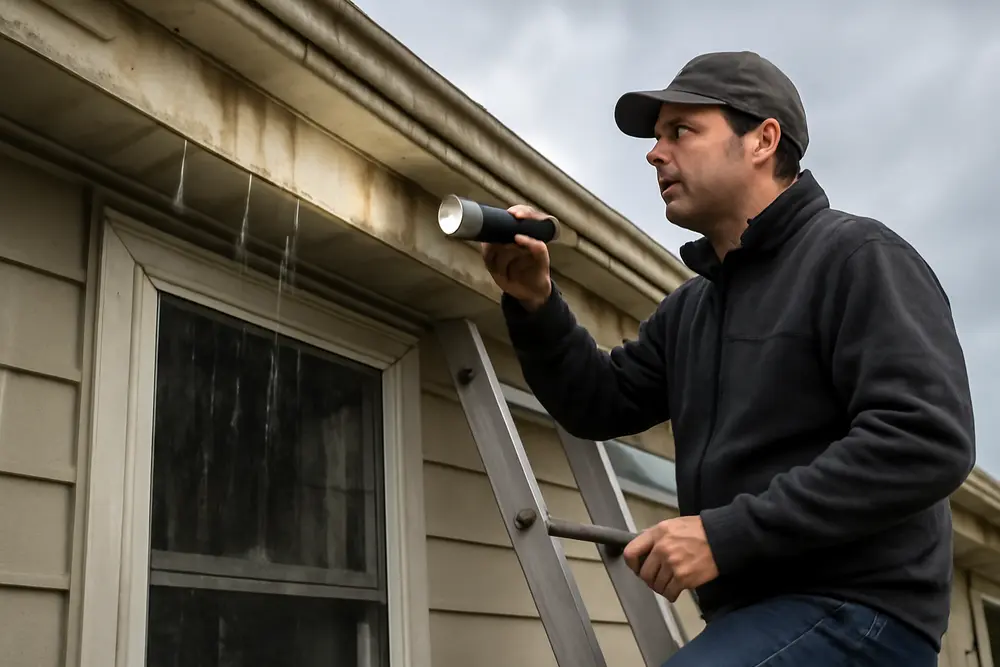
Roof Edges, Soffits, And Eaves
At the roof perimeter, gusts push water under the shingle edges and into gaps at drip edges or fascia seams. Soffit vents can let in fine mist that later shows up as attic stains near the overhang. If there are missing shingles or a tired underlayment, the deck soaks it up like a sponge.
Flashing Around Protrusions
Any place the roof changes direction or intersects with a wall is a leak opportunity. Step flashing should be tucked and layered along roof-to-wall joints. Kick-out flashing belongs where the lower end of that joint meets the gutter to kick water into the trough instead of into your wall. Around chimneys, skylights, and dormers, worn sealant or missing counterflashing will not stop a sideways blast for long.
Siding Transitions And Corners
Horizontal trim boards, Z-flashing over band boards, and J-channels around penetrations are all targets. If the cladding lacks a continuous water-resistive barrier or has unsecured laps, wind-driven rain can riding the sheathing and pop out as interior stains long after the sky clears.
Windows And Doors
Water can ride up under a window head that lacks proper head flashing, pool at a sill without a pan, or back up if weep holes are clogged. Caulk shrinkage along jambs looks cosmetic but behaves like a welcome mat for storm water. During wind events, pressure differences can literally pull water past a weak gasket or weatherstrip.
Attic Vents And Penetrations
Plumbing stacks, ridge vents, and gable vents can all admit wind-driven spray if the flashing is cracked or fasteners have backed out. In many homes, the first sign is a faint brown halo on the roof deck or damp insulation near the vent line.
Signs You Can Actually Spot
Hidden leaks love to pretend they are mysterious. They are not. You just need to know what to look, feel, and sniff for after a storm with strong gusts.
Inside The Attic
Take a flashlight up high once the storm passes. Look for darker wood on the underside of the roof deck. Those blotches that look a shade deeper than the surrounding plywood are usually moisture. Check around plumbing stacks, chimneys, and the places where the roof meets a wall. Insulation that feels heavy or clumpy is wet. With blown cellulose, parting it gently will show you where it clumped and collapsed.
Ceilings And Walls
Fresh tea-stain rings on drywall, a single bubble in paint, hairline cracks that just got wavier, or trim that now shows a faint gap are all sneaky tells. Press gently with the back of your knuckle. If it feels soft or spongy, it is holding moisture. A musty odor arriving right after a windy storm is your nose announcing hidden moisture, often in wall cavities.
Exterior Checks
Walk the perimeter. Look for loose siding laps, popped nails, curling shingles, missing kick-out flashing at the end of a roof-to-wall intersection, and sealant that has split where siding meets window trim. Paint that is peeling just below a horizontal trim piece often means water is getting behind that joint and exiting on the face.
| Symptom After Wind-Driven Rain | Likely Source To Check |
|---|---|
| Stain at top of interior wall near exterior corner | Missing or short kick-out flashing at roof-to-wall |
| Water on window stool with no obvious sash leak | Clogged weep holes or missing head flashing |
| Musty attic odor and dark roof deck spots | Soffit intake, ridge vent, or flashing gaps |
| Peeling paint below horizontal trim outdoors | Failed Z-flashing and trapped water behind trim |
| Ceiling bubble near a chimney chase | Counterflashing failure or cracked crown |
The First 48 Hours Matter
Water has a short fuse before mold and structural issues pile on. If a storm just smacked your place with sideways rain, triage fast and smart.
Get The Water Out And The Air Dry
Open interior doors to circulate air. If the outside air is less humid than inside, crack windows briefly to exchange air, then shut them and run dehumidifiers to keep indoor relative humidity below 60 percent. Aim box fans or air movers across wet surfaces to keep air skimming. Pull back wet carpet from baseboards and remove saturated area rugs to an outdoor spot to drip dry.
Pull Wet Materials That Will Not Dry Fast
Porous materials that stay wet longer than a day or two can fuel mold. Remove soaked baseboards to expose the wall-to-floor joint. If drywall feels soft, cut a small inspection hole near the base and check with a moisture meter. If you find elevated readings or visible damp insulation, open the wall to allow airflow. Wet blown cellulose rarely rebounds. Fiberglass batts can sometimes be dried in place if only slightly damp and the cavity is ventilated, but replace anything that is saturated.
Document Like You Are Building A Case File
Snap photos before you move or remove anything. Capture wide shots and close-ups of stains, the suspected entry point, and the water path. Record moisture meter readings with the date and location. Keep receipts for fans, dehumidifiers, and temporary materials. If you pull wet insulation or drywall, bag and tag a small sample for the adjuster if the loss becomes an insurance claim.
Temporary Weatherproofing
Seal small exterior gaps with a high quality exterior-grade polyurethane or 100 percent silicone. Do not caulk over or block window weep holes. For minor flashing gaps or nail holes at shingles, roofing cement can be an emergency patch. Missing kick-out flashing will need a proper install to truly solve the issue, but a short diverter extension into the gutter can help until a pro fits the correct piece.
Keep An Eye On Mold Risk
Mold can start colonizing within 24 to 48 hours when organic materials stay wet. Keep humidity under 60 percent, remove unsalvageable porous items, and continue airflow across affected surfaces until moisture readings return to normal baseline levels for your home. If you see fuzzy growth or smell earthy odors, plan for professional remediation along with moisture source repairs.
Tools For Hidden Leak Detection
Hidden leak detection is part detective work, part science. You can do a lot with a flashlight and patience, and the right tools make it faster and more accurate.
Moisture Meters
Pin-type meters take readings inside the material, which is helpful for drywall and framing. Pinless meters scan a larger area and are handy for mapping. Compare wet spots to known dry areas to set a baseline. Document numbers and locations for your records.
Thermal Or Infrared Cameras
Moisture evaporates and cools surfaces slightly. After sunset, use a thermal camera indoors to spot cooler, irregular patches on ceilings and walls that track along framing or below window heads. Cold spots do not always equal water, but after a storm they are a strong lead to investigate with a moisture meter.
Flashlight Attic Walk
Turn off the attic light and use a bright flashlight at a shallow angle along the roof deck. That raking light makes sheen from moisture pop out. Look closely around step flashing lines, vent pipes, and valleys.
Controlled Hose Testing
Pick a dry day with a helper inside. Start low and move up. Spray water gently in sections with a garden hose for a few minutes per target area. Work methodically from the lowest suspect joint up toward the roof. Do not blast upward under shingles. If water appears inside when you hit a specific seam, you just isolated your culprit. Stop and dry immediately after testing.
Know Your Flashing
Step flashing should overlap like shingles, each piece tucked under the course above and over the shingle below. Counterflashing on masonry should be cut into the mortar joint, not just glued on the surface. Kick-out flashing is a diverter that starts under the last piece of step flashing and empties into the gutter. Many modern building codes require kick-out flashing at roof-to-wall transitions for exactly this reason. If it is missing, install one and thank yourself next storm.
Repairs And Prevention
Once you have the culprit, fix the path and upgrade the defenses so the next windy tantrum is boring.
Flashings That Actually Work
Replace corroded or short step flashing with properly sized pieces, integrating them shingle by shingle. Use corrosion-resistant metal and observe correct overlaps. For chimneys and skylights, set new base flashing and integrate counterflashing into mortar joints or curbs. Avoid relying on sealant alone. Sealants are helpers, not structure.
Install Kick-Out Flashing
If your roof ends into a wall with a gutter nearby and there is no kick-out, add one. The diverter should be sized and angled to send water into the gutter without splashing behind siding. Missing kick-outs are one of the top causes of hidden wall leaks from wind-driven rain damage.
Windows And Doors That Drain
Clean weep holes with a small brush or compressed air. Add backer rod and flexible sealant to failed joints around trim, but do not seal the bottom of the window where drainage is intended. If there is no head flashing, a proper retrofit with flashing tape and metal head flashing that tucks behind the weather barrier is the right solution. Sill pans or back-dammed tapes help direct any intruding water back out, not into the wall.
Mind The Siding Details
Ensure Z-flashing above horizontal trim and at the tops of windows and doors. Reattach loose laps and replace cracked pieces. For stucco or fiber cement, check that control joints and penetrations are sealed with compatible materials. The weather-resistive barrier behind siding should be intact and properly lapped if you open a section for repairs.
Gutters And Drainage
Keep gutters clean and pitched correctly. Add downspout extensions to discharge water at least 5 to 10 feet from the foundation. In heavy wind, an overflowing gutter can dump water right onto siding joints that were never meant to be mini waterfalls.
Pick Materials That Can Take A Punch
Impact-rated shingles, high-quality fasteners, and code-compliant flashing upgrades all reduce risk. Around penetrations, choose sealants rated for UV and joint movement. Inside, use moisture-resistant drywall in splash-prone areas and control indoor humidity with properly sized ventilation equipment.
Costs And Insurance Basics
Pricing depends on what the water touched and how far it traveled. Re-caulking windows and clearing weep holes is pocket change. Replacing step flashing and a few shingles is usually a modest roofing repair. Pulling and drying a few wall cavities and replacing insulation may be a mid-range restoration job. If water ran behind siding for multiple storms, you could be looking at siding removal, sheathing repairs, and comprehensive structural drying.
Home policies often cover sudden and accidental wind-driven rain damage, especially when the exterior was intact before the storm. Exclusions can apply if there is evidence of long-term neglect or pre-existing wear like rotten fascia or missing shingles that went unfixed. Flooding from rising groundwater is a different policy. File promptly, document your mitigation efforts, and be prepared to share moisture maps, photos, and receipts. If you are unsure how to present damage, Best Option Restoration of Travis County can produce detailed moisture documentation that adjusters understand.
When Should You Call Pros?
Call restoration and roofing professionals when leaks persist after your DIY patches, when you see structural damage, or when multiple rooms are affected. If there is visible mold, if you smell a heavy earthy odor, or if the attic insulation is saturated, you will save time and materials by getting professional drying and remediation started quickly. Avoid roof work if you are not comfortable on ladders, and never open up wet walls around electrical without cutting power and using proper protection. Pros bring moisture meters, thermal cameras, negative air machines, and the experience to target water pathways without ripping apart half the house.
If you are in Austin or nearby, storms that swing in from the Hill Country can stack wind with sudden downpours. That combo hits kick-out flashing, siding joints, and soffits hard. Best Option Restoration of Travis County handles wind-driven rain damage daily during storm season. We track moisture in attics and wall systems, install targeted drying, and coordinate repairs so the next storm is a non-event. Call any time for fast assessment, moisture mapping, and structural drying.
FAQ: Wind-Driven Rain And Hidden Leaks
Why Does My Ceiling Only Leak During Windy Storms?
Wind forces water into places calm rain never reaches. Pressure differences can pull water past small gaps at flashing, siding transitions, and window heads. If a stain appears only when it is windy, focus your inspection on roof-to-wall joints, kick-out flashing, and window head flashing.
How Fast Do I Need To Dry Wet Materials?
Start immediately. Aim to get surfaces drying within hours and keep indoor relative humidity under 60 percent. Mold can begin colonizing within 24 to 48 hours on damp organic materials. If you cannot lower moisture quickly or access hidden cavities, bring in a restoration team.
Should I Caulk My Window Weep Holes?
No. Those holes let water that gets into the window frame drain out. Blocking them turns your window into a bathtub with no drain. Clean them instead, and address head flashing and sealant joints that are actually meant to be sealed.
Can I Dry Wet Insulation In Place?
Maybe. Slightly damp fiberglass batts sometimes dry with strong airflow. Heavily soaked batts or any blown cellulose that clumped should be removed and replaced. Wet insulation loses R-value and can trap moisture against framing.
How Do I Know If Kick-Out Flashing Is Missing?
Find where a sloped roof dies into a vertical wall near a gutter. If you do not see a small angled diverter at the end of the step flashing that dumps water into the gutter, you probably need one. If you see staining on the siding below that point, install it sooner rather than later.
Is A Thermal Camera Worth It For Hidden Leak Detection?
For recurring wind-driven rain investigations, yes. An entry-level thermal camera can quickly highlight suspicious cool zones after a storm so you can target moisture meter checks without guessing or opening the wrong wall.
Your 48-Hour Action Plan
Right after the wind dies down, check the attic for dark deck spots and damp insulation. Walk the exterior and scan roof-to-wall joints for missing kick-out flashing and cracked sealant. Inside, look for fresh stains at ceilings, window heads, and outside corners. Set dehumidifiers and fans, keep humidity below 60 percent, and pull any obviously wet baseboards and carpet edges to let cavities breathe. Document everything with photos and moisture readings. Patch small gaps with the right sealant and schedule permanent repairs for missing or failed flashing. If staining spreads or moisture numbers stay high after a day, call Best Option Restoration of Travis County to map the water, open only what needs opening, and dry it down before mold and rot take the wheel.