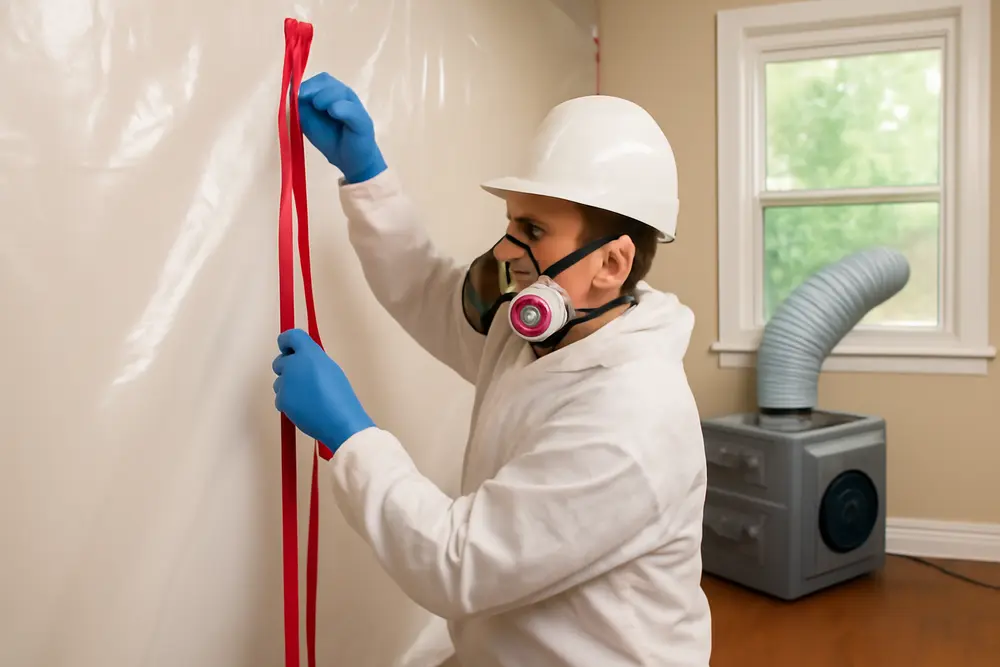

If you’re gearing up to remove mold yourself, here’s the play: stop spores from hitchhiking into the rest of your home. That means mold containment that actually contains, negative air pressure that pulls air into the work zone instead of blasting it out, HEPA air scrubbers that run like they mean it, and a clean exit routine so you don’t track a mold confetti trail across your hallway. This is your quick, field-tested guide to zoning the workspace, keeping pressure on point, exiting without spreading the mess, and what to confirm before you take the plastic down.
Fix Moisture First
Containment without moisture control is like bailing a boat with a pasta strainer. Find and fix the source that fed the mold before you start demolition or cleaning. Patch the leak, correct grading, replace the failed wax ring, unclog the condensate line, or upgrade ventilation. If humidity is the culprit, run a dehumidifier and get the area below 60 percent relative humidity, ideally closer to 45 to 50 percent. If materials are wet, start controlled drying inside your future containment zone so you’re not moving damp, spore-loaded air through the rest of the house. No fix equals no win.
What Is Mold Containment?
Mold containment is a physical separation between the dirty work zone and the clean areas you actually live in. Think plastic walls, taped seams, sealed vents, and zippered doors that keep disturbed spores from drifting away during demolition and cleanup. You’ll use it any time you’re disturbing suspect growth or removing porous materials. Bigger projects over roughly 100 square feet of growth, work near HVAC returns or supplies, and jobs in high-traffic areas absolutely warrant proper mold containment with negative air pressure. OSHA’s mold remediation guidance backs the need to isolate, seal HVAC openings, and control airflow while you work.
Map Zones Like A Pro
Walk the space and plan your lanes. You want a single, controlled path in and out, not a choose-your-own-adventure. Create one primary work zone where removal happens. Build an entry airlock or decon room just outside that zone using another layer of plastic with its own zip door. That small buffer lets you gear up and doff PPE without sending spores straight into the hallway. Seal or cover any HVAC supplies and returns inside or near the work area so the system doesn’t inhale spores and redeposit them around the house. If waste needs to leave mid-job, give it a dedicated route that doesn’t pass through bedrooms or living spaces.
For materials, plan on 4 or 6 mil plastic sheeting for walls and floors, painter’s tape for delicate finishes, quality duct tape for seams, a zipper door kit, pole jacks or furring strips for top support, and foam or putty to block penetrations at cables and pipes. Overlap seams by at least 12 inches and tape both sides. Run plastic on the floor and up the wall several inches to create a bathtub effect so debris doesn’t sneak under. If the ceiling is textured or fragile, use painter’s tape as a base layer before taping plastic to it. Keep pets and curious humans on the clean side of the line.
Negative Air 101
Negative air pressure means air flows into your work zone from clean areas instead of out toward them. You create it with a HEPA-filtered air scrubber or negative air machine that exhausts to the outdoors. Makeup air should come from the clean side through your airlock, which feeds the machine and exits outside. The plastic should draw inward slightly if you’re doing it right. A simple rule of thumb is to target a pressure difference around minus 0.02 to minus 0.05 inches of water column, which is only a few Pascals but makes all the difference. A small differential like that keeps air moving the right way without collapsing your plastic walls.
Set the machine inside the containment near the exhaust port. Duct the discharge outdoors through a window or door insert that’s sealed tight so nothing backflows. Do not exhaust into the attic, crawlspace, garage, or HVAC return unless those are fully isolated from the home’s breathing zone. Keep doors and windows to the outside closed except for your exhaust, or you’ll break the pressure balance. Let the machine run continuously from the moment you disturb materials until you pass final checks. If you pause negative air, spores do what spores do, and they settle wherever they please.
Run HEPA Air Scrubbers The Right Way
HEPA filters capture particles down to 0.3 microns at 99.97 percent efficiency, which is exactly the size range where mold spores love to travel. Inside containment, your scrubber does double duty: it keeps negative air pressure when you duct outside and it polishes the air by grabbing what demolition kicks up. Size the unit by volume and aim for at least 4 to 6 air changes per hour for light work. Pros often push 6 to 12, especially during demolition. Do the math: length times width times height equals room volume. Multiply by desired air changes per hour, then divide by 60 to get the minimum cubic feet per minute rating. If your space is 10 by 12 by 8 feet, that’s 960 cubic feet. At 6 ACH, you need around 96 CFM. Most machines are 500 to 2000 CFM, which gives you headroom for filters and ducting losses.
Use a prefilter to catch big debris and protect the main HEPA. Change prefilters often so you don’t choke airflow and lose pressure. Place the scrubber to pull air across the workspace, ideally drawing from the clean-side door path and exhausting at the far end. During demolition and cleanup, run it nonstop. After final cleaning, let it run long enough to knock down any remaining airborne load. That might be several hours to overnight, depending on size and level of disturbance. If your machine has a pressure gauge across the filter, watch it. A rising gauge means the filter is clogging, which reduces both filtration and negative air pressure.
Clean Entry And Exit
Your decon area is where you suit up and shed gear without sprinkling spores through the house. Lay a floor layer of plastic in the airlock and keep it clean. Sticky mats are optional but helpful for gritty surfaces. Keep a trash can or contractor bags ready for disposable PPE. No food or drinks inside containment. Tools live inside until cleaned.
Doffing should be a routine, not a freestyle event. In the dirty room at the work-zone side, HEPA vacuum your suit if it is reusable. Mist disposable suits lightly with water if they’re dusty. Remove tape at the wrists and ankles. Remove outer gloves and disposable coveralls. Wipe or HEPA vacuum tools and set them aside on a clean poly surface. Step into the clean side of the airlock. Remove respirator last, after opening the clean-side zipper so you’re breathing clean air. Bag disposables before they leave the airlock. If you use a reusable full-face or half-mask respirator, clean it according to the manufacturer’s instructions right away so the next use isn’t a bio-snack.
Dust-Lite Demo And Cleaning
Containment is half the battle. The other half is not making a blizzard inside it. Keep materials damp while cutting or removing, not soaked. A plant mister is your best friend. Score caulked edges before pulling baseboards so you don’t shred drywall. Use hand tools where you can and cut gently with power tools that have local HEPA vacuum attachments if you’ve got them. Bag debris inside containment, then wipe the outside of the bag before it heads through the airlock. Hard non-porous surfaces can often be cleaned and saved. Porous items that are moldy and can’t be fully cleaned, like drywall and insulation, usually need removal.
Once demolition is done, do the clean trio: HEPA vacuum every surface, then damp-wipe all reachable surfaces with a mild detergent solution or a product labeled for mold cleanup, then HEPA vacuum again after it dries. Scrub textured surfaces and rough framing well so no dust remains. Do not count on bleach to penetrate porous materials. If the area still looks dusty under raking light, it is. Clean again. Let everything dry. Keep the scrubber and negative air running through this whole phase.
What To Check Before Tear-Down
Tearing down early is how spores get a second chance. Check these items before you even think about removing plastic. The space must pass a visual inspection with strong lighting. No settled dust on flat surfaces, sills, or ledges. No visible growth on cleaned substrates. Surfaces should be dry. If you run a fingertip over a sill and get a dust streak, you’re not done. The HEPA air scrubber should have run for a reasonable post-clean period to capture what you kicked up during the wipe-down. If you’re tracking pressure, you should still have negative air pressure holding steady at roughly minus 0.02 to minus 0.05 inches of water column while the barriers are in place.
Check barrier integrity: seams still stuck, no flapping edges, zip doors closing cleanly. Hold a tissue near the airlock gap and verify air pulls inward. Only after you clear these checks do you power down the scrubber. Mist the interior face of the plastic with clean water so dust sticks. Start removing plastic from the farthest point and fold it inward on itself as you go. Bag the plastic before it leaves the airlock. Keep the decon area up the entire time and break it down last. If your project is large or sensitive, consider third-party clearance testing. It is the gold standard for confirmation.
Minimal Gear Checklist
Here’s a fast-reference gear list and why each piece matters.
| Gear | Why You Need It |
|---|---|
| 4-6 mil plastic sheeting + zipper door | Builds mold containment walls and controlled entry |
| HEPA air scrubber or negative air machine | Creates negative air pressure and filters spores |
| Ducting and window panel | Exhausts air safely outdoors |
| Quality tape and pole jacks | Seals seams and supports plastic without sagging |
| N95 or P100 respirator | Protects lungs during demolition and cleaning |
| Gloves, eye protection, disposable coveralls | Stops skin and clothing contamination |
| HEPA vacuum | Captures fine dust on surfaces and tools |
| Detergent or EPA-registered cleaner | Removes residue and helps lift spores from surfaces |
| Dehumidifier and hygrometer | Controls moisture and verifies drying progress |
Common Mistakes To Avoid
Do not exhaust your scrubber back into the house unless it is strictly recirculating for polishing air and you have a separate machine providing negative air pressure to the outdoors. If you recirculate without exterior exhaust, you do not have negative air pressure. Do not leave supply and return vents open in or near the work zone. Do not open the containment every five minutes to grab a tool. Set up a staging area inside and bring what you need. Do not take off your respirator inside the dirty room because the zipper was annoying. Do not shut down the scrubber the moment the last bag leaves. Let it keep working while you do the final clean and for a bit after. Do not skip prefilters. A choked HEPA is a sad HEPA that fails you when you need it most. Skip fog-only approaches. Fogging can be a supplement, not a substitute for removal and cleaning.
How To Check Pressure Without Fancy Meters
A manometer is best for verifying negative air pressure, but a quick field check helps. Crack the clean-side zipper a few inches and hold a tissue or a strip of lightweight plastic near the opening. It should pull inward toward the work zone. If it flutters outward, you either broke a seal, lost airflow due to a clogged filter or kinked duct, or you opened a window that created a cross-breeze. Reset the seals, check ducting, close windows, and try again. When in doubt, step up to a real differential pressure gauge so you can keep eyes on the minus 0.02 to minus 0.05 inches of water column target throughout the job.
When To Call Pros
Some projects should not be DIY. If visible mold is widespread over roughly 100 square feet, if growth extends through wall cavities or into complex HVAC systems, if the structure is saturated, if sewage or contaminated water is involved, or if anyone in the home is immune-compromised or has serious respiratory issues, get professional help. Certified firms follow standards like IICRC S520 and use proper engineering controls, documentation, and post-remediation verification. If you want it handled end-to-end, our team uses specialized containment setups, negative air machines, HEPA filtration, and moisture management built to pass clearance. You can read more on our service approach at Best Option Restoration Mold Clean Up Services.
Quick FAQ
Do I Really Need Negative Air Pressure?
Yes if you’re removing moldy materials or cleaning heavy growth. Negative air pressure pulls air into the work zone so spores do not drift out. Without it, you’re guessing and the rest of the house pays the price. Keep the machine running from first cut through final cleaning.
What Pressure Should I Aim For?
Common guidance is a gentle negative air pressure of about minus 0.02 to minus 0.05 inches of water column. That range is enough to control airflow without crushing plastic walls. A manometer is the most reliable way to verify it.
How Long Should I Run The HEPA Scrubber After Demo?
Run it throughout demolition and cleaning, then continue for several hours to overnight after your last HEPA vacuum and damp wipe. Larger jobs or dustier work may need more runtime. Keep doors and windows closed so you do not break the pressure balance.
Can I Exhaust Into The Attic Or Garage?
Only if that space is fully isolated from the home’s breathing zone. Most attics and garages are not. Route discharge outdoors through a sealed window panel or door insert so you do not relocate spores to a new staging area.
Will A Regular HEPA Air Purifier Work?
Portable HEPA purifiers can help polish air but they usually do not provide enough airflow or ducted exhaust to create negative air pressure. If you cannot exhaust outside, you are missing the key control that keeps spores from leaving the work area.
Should I Fog The Area Instead Of Removing Materials?
No. Fogging alone does not remove colonized, porous materials or settled dust. It can be a supplement to proper source removal and cleaning, not a replacement for it.
References And Useful Guides
OSHA outlines safe mold remediation practices that include isolating work areas, sealing HVAC openings, and using decontamination procedures. You can view their activity sheets under building remediation at osha.gov.
RCR Environmental describes containment basics, negative air pressure setup, and HEPA filtration strategies that track with industry-standard methods. See their overview at rcrmold.com and a practical setup blog at this post.
SafeAir Mold Testing provides specific notes on maintaining a pressure differential in the minus 0.02 to minus 0.05 inches of water column range during remediation. Their protocol notes are at safeairmoldtesting.com.
For PPE recommendations, including respirator types, protective clothing, gloves, and eye protection, IAQ Environmental lists typical setups used during remediation at iaqenvironmental.com.
If you want help from a service that uses specialized mold containment and negative air pressure equipment, start here: Best Option Restoration Mold Clean Up Services.