

Your bathroom fan is supposed to kick steamy air to the curb. If it’s dumping that moisture into your attic, you’re basically fog-machining your roof framing and insulation. That trapped humidity condenses on cold wood, feeds attic mold, and slowly turns your rafters into a snack. The fix is straightforward: correct bathroom fan venting, solid air sealing, and the right insulation strategy. Here’s a clear, slightly sassy homeowner’s guide to stop attic mold at the source and clean it up safely if it already showed up to the party uninvited.
Why Attic Mold Follows Bad Venting
Bathrooms crank out moisture. Showers and baths spike humidity, and without a proper exit route, that water vapor rides the fan duct straight into the attic. Once it hits cold surfaces like roof sheathing and uninsulated ductwork, it condenses into liquid water. Wet wood plus time equals mold growth, and if you give it long enough, rot and structural damage. Insulation takes a hit too. Fiberglass batts that get damp slump and lose thermal performance, which means higher energy bills and a home that never quite feels comfortable.
Attics are supposed to be dry. If your fan exhaust is ending anywhere inside the attic, near a ridge vent, or right under a soffit intake, you’re creating a moisture loop. Mold spores are everywhere waiting for the right conditions. When you hand them warm, wet air, they RSVP with gusto.
What Codes Expect
Modern building codes generally require that mechanical exhaust air from bathrooms go outdoors, not into the attic, crawl space, soffit cavity, or ridge vent. That means the duct must terminate outside with a proper hood or cap that includes a backdraft damper. Many jurisdictions base this on the International Residential Code, but local enforcement can vary, so check with your code office.
Bath fans also need to move enough air. Typical requirements are at least 50 CFM for intermittent operation or around 20 CFM for continuous operation. Choose the right capacity for your bathroom’s size and fixtures, and make sure the ductwork does not cripple that airflow with bad sizing, reductions, or a maze of elbows.
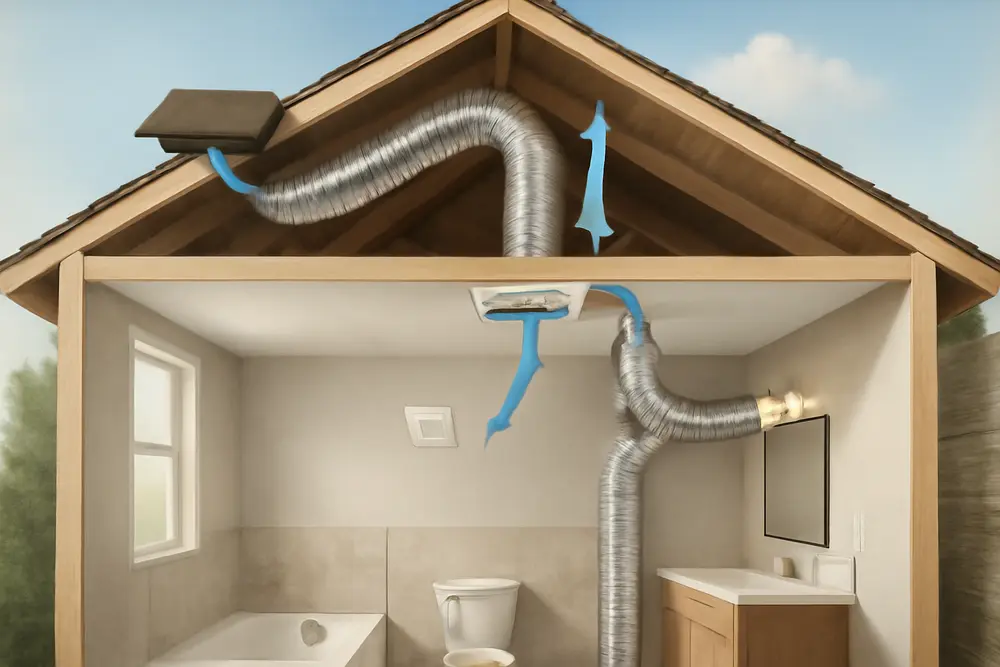
The Right Ways To Vent
You’ve got a few legal, smart routes to kick damp air outside. Choose one that keeps the run short and smooth, with a real exterior termination.
Roof Termination: A dedicated roof cap with a built-in damper is a common choice. That means a sealed roof penetration, proper flashing under the shingles, and a straight, well-supported duct connection to the fan. Use a cap designed for bath exhaust, not a generic hole with a screen.
Exterior Wall Termination: For lower floors or short lateral runs, a wall cap works great. Keep the duct gently sloped outward so any condensation drains away from the bathroom fan. Use a cap with a damper and a hood that sheds rain.
Soffit Termination: This is only acceptable where your local code allows it and only with a dedicated soffit exhaust hood specifically made to prevent moist air from being sucked back into the attic intake vents. The hood must push air outside the soffit plane. Even then, it’s tricky. If there’s any chance of recirculation, pick a different route.
| Termination | Pros | Watch Outs |
|---|---|---|
| Roof | Short, direct path; ideal for upstairs baths | Needs pro-level flashing; keep snow and debris clear |
| Exterior Wall | Easy access; good for first-floor baths | Long lateral runs can hurt airflow if not sized right |
| Soffit | Sometimes simplest path | Only with proper hood and layout that avoids re-entry |
Ducts, Sizing, And Slope
The best bathroom fan venting is boring in the best way. Smooth metal duct, correctly sized, short, straight, and sealed. That’s it.
Material: Use rigid or semi-rigid metal duct. Flexible foil or plastic duct sags, collects condensation, and grows lint stalactites that choke airflow. If you must use a short flex connector for vibration, keep it tight and fully supported.
Size: Match the fan’s outlet size, typically 4 to 6 inches. Don’t neck down a 6-inch fan to a 4-inch duct unless the manufacturer explicitly allows it. Reductions kneecap airflow and make the fan noisy.
Layout: Keep the run as short as possible with gentle bends, not sharp turns. Fewer fittings mean less static pressure. Support the duct every few feet so it doesn’t sag. Where the duct runs through a cold attic, slope it slightly toward the exterior termination so any condensation drains away from the fan housing.
Termination: At the exterior, use a hood with a backdraft damper. That flapper should move freely and close when the fan is off. No insect screens that clog and freeze the flap in place.
Seal And Insulate Like You Mean It
Even a perfect duct layout leaks if you skip the air sealing. Every joint, seam, and penetration should be tight. Use foil HVAC tape rated for ducts on the joints and silicone or polyurethane caulk where the duct meets the roof or wall cap. Mastic is great on metal-to-metal seams too. Replace brittle tape that’s peeling with proper duct sealant products.
Insulate ducts that run through unconditioned spaces. That sounds boring, but it stops warm, moist air from condensing on the cold duct. Wrap with duct insulation that includes a vapor retarder facing and tape the seams. If you can slip the metal duct inside an insulated sleeve of the right diameter, even better.
Don’t forget the bathroom side. Air seal the fan housing where it penetrates the ceiling with caulk or low-expansion foam. Then cover the fan box with insulation in the attic if the manufacturer allows it. Any gap between drywall and the fan housing is an express lane for warm, moist air to sneak into your attic whether the fan is running or not.
While you’re in the attic, take a 360-degree look. Are soffit vents clear or buried in insulation? Is the ridge vent blocked by felt or debris? Balanced attic ventilation matters. Just make sure your bath fan does not terminate near soffit intakes or under the ridge.
Common Mistakes To Fix
Ending The Duct In The Attic: A duct that stops short in the attic or under a ridge vent is a mold factory. Extend and terminate it outdoors with a proper hood.
Using Flimsy Flex Duct: That shiny slinky tube sags, pools water, and starves your fan. Swap it for rigid or semi-rigid metal and insulate it.
Long, Twisty Runs: Too many bends or a long snake of duct kills your CFM. Re-route to a shorter path or upsize the duct based on manufacturer recommendations.
No Damper At The Cap: A missing or stuck backdraft damper lets cold air and pests crawl in and allows moisture to backflow. Replace the cap with a quality unit.
Leaky Joints And Uninsulated Runs: If you can feel air moving at a joint, that’s a leak. Tape, mastic, insulate, and call it a day.
Spotting And Stopping Mold
Attic mold usually starts as dark spotting on the underside of roof sheathing, rafters, or trusses near a leaky duct termination. You might also see matted, funky insulation or smell a musty odor on humid days. Before you clean, suit up. Wear gloves, eye protection, and at least an N95 respirator. If the attic is tight or there’s tons of growth, step back and call a pro.
Small Areas: If the total visible area is small, careful homeowner cleanup can be appropriate. Gently HEPA vacuum loose spores from surfaces. Clean wood with a detergent solution or a cleaner labeled for mold remediation on structural materials. Avoid soaking the wood. Bleach on raw wood is not a great plan because it adds moisture and can leave behind residues. After cleaning, let the area dry thoroughly and consider a mold-resistant primer on stained surfaces. Toss any contaminated, non-washable insulation and bag it before carrying it through living spaces.
Bigger Problems: If growth covers roughly more than 10 square feet, is embedded deep in wood, or if you suspect hidden mold behind sheathing or in insulation, it’s time to bring in pros. Disturbing large amounts of mold in an attic without engineering controls can spread spores to the rest of the house. Best Option Restoration handles safe containment, HEPA filtration, removal of contaminated materials, cleaning, and post-treatment drying. If you’re in Travis County, you can learn more on our Mold Clean Up Services page at Best Option Restoration of Travis County.
Fix The Source First: Cleaning without correcting the bathroom fan venting is like mopping with the faucet still running. Reroute and seal the duct, then clean, not the other way around.
When Should You Call A Pro?
There are a few clear triggers for professional help. If the attic mold is widespread or you’re seeing wood rot or delamination, you need trained remediation and a moisture-control plan. If the bathroom fan duct needs a new roof penetration, bring in a roofer or HVAC contractor who knows how to flash a roof cap correctly. If you have older loose-fill insulation that might be vermiculite, stop and get it tested before disturbing it. Some materials can contain asbestos and need specialized handling.
We handle inspections, moisture diagnostics, safe mold removal, and post-remediation verification. When you’re ready for a clean slate and a mold-resistant attic, talk to Best Option Restoration or schedule service with Best Option Restoration of Travis County right here: Mold Clean Up Services.
Quick Homeowner Checklist
- Find your bath fan termination. If it ends in the attic, reroute it outside.
- Use rigid or semi-rigid metal duct sized to the fan outlet. Keep runs short with gentle bends.
- Seal every joint with foil tape or mastic and caulk penetrations. Insulate ducts in the attic.
- Air seal the fan housing at the ceiling and insulate around it if allowed by the manufacturer.
- Verify a proper exterior hood with a working backdraft damper. No clogged screens.
- Set a timer control so the fan runs 20 to 30 minutes after showers.
- Inspect attic wood and insulation for spotting, dampness, or musty odors. Handle small cleanup safely or call a pro.
- Confirm your fan’s CFM rating is adequate for the bathroom’s size and layout.
Choosing The Right Fan
If you’re upgrading the fan while fixing the venting, get the sizing right. For a standard bathroom, aim for at least 50 CFM. Larger spaces or bathrooms with jetted tubs need more capacity. A rough rule of thumb is 1 CFM per square foot for 8-foot ceilings, then adjust for higher ceilings or separate toilet rooms. Look for quiet fans with low sone ratings so you’re more likely to actually use them. Consider a humidity-sensing fan or a wall timer that guarantees the fan runs long enough after a shower.
Cost And Practical Tips
Pricing swings with access, roof type, and local labor rates, but here are ballpark ranges homeowners often see. Adding a proper roof termination through shingles with a cap and flashing can land in the few-hundred-dollar range for labor and parts, more for high or complex roofs. Replacing a fan with a higher CFM unit varies widely depending on drywall work and electrical, and duct upgrades can range from a quick afternoon to a multi-trade job if rerouting is needed. Duct insulation and sealants are inexpensive compared to the cost of repairing moldy sheathing and ruined insulation.
A few practical moves make life easier: install a labeled switch or timer so guests actually run the fan, check the exterior hood every season to make sure the damper swings freely, and keep the path inside the attic clear so you can inspect the duct and sheathing quickly after heavy cold snaps or long humid stretches.
What About Soffit Venting?
Soffit venting sounds convenient, but it’s easy to get wrong. A standard intake soffit vent will pull that moist air right back into the attic. If soffit termination is allowed by your code, use a dedicated soffit exhaust hood that projects flow outside the intake plane, and position it away from intake vents. Add baffles so attic insulation does not block the soffit intakes. If you can avoid soffit termination entirely, do it and head for a wall or roof cap instead.
Attic Mold Risks You Shouldn’t Ignore
Besides looking like your attic picked up a polka-dot hobby, mold indoors can aggravate allergies and respiratory issues. It’s also a warning sign of chronic moisture that can lead to wood decay. Attic sheathing that stays damp gets wavy, fasteners loosen, and shingles don’t last as long. Mold on insulation can reduce R-value and spread musty odors through the house on windy days. Stop the moisture source, dry the structure, and only then think about repainting or replacing finishes. Skipping steps just invites a repeat performance.
Bathroom Fan And Attic Mold FAQ
Can I Vent A Bathroom Fan Into The Attic If I Add More Attic Vents?
No. More attic vents don’t make it acceptable to dump bathroom exhaust inside. Mechanical exhaust must discharge outdoors through a proper termination. Extra attic ventilation is helpful for overall moisture control, but it does not replace correct bathroom fan venting.
How Long Should I Run The Fan After A Shower?
Plan on 20 to 30 minutes. A timer switch is the easiest way to make this automatic. If mirrors still fog up after that, consider a higher CFM fan or improving the duct layout.
Do I Need To Insulate The Duct If I Live In A Warm Climate?
Yes, if the duct runs through an unconditioned space. Even in warm climates, cool nights and air conditioning can create temperature differences that drive condensation. Insulation keeps water off your duct and out of your attic.
Is Bleach The Best Way To Clean Attic Mold?
Bleach isn’t ideal for raw wood and can add unnecessary moisture. Use a HEPA vacuum for loose spores, then a detergent or a cleaner made for structural surfaces. Dry thoroughly and consider a mold-resistant primer on stained wood. If the growth is significant, call a professional.
Why Is My Fan So Loud And Still Doesn’t Clear Steam?
Undersized ducts, too many bends, or a duct that necks down can make the fan loud and weak. Replace flex duct with rigid or semi-rigid metal, match duct size to the fan outlet, and shorten the run. If the fan is undersized, upgrade to a higher CFM model.
What If My Attic Already Has Mold But I Fixed The Venting?
Great first step. Now address what’s left. Small, accessible areas can be cleaned carefully with proper PPE, but larger or stubborn growth needs professional remediation to avoid spreading spores and to verify dry, clean surfaces before you button the attic back up.
Ready For A Mold-Free Attic?
Set your bathroom fan up to win: exhaust to the outdoors, seal the path, insulate the duct, and give the attic steady, balanced ventilation that does not recirculate moisture. If you find attic mold while you’re at it, Best Option Restoration is your cleanup crew. For full-service remediation in the Austin area, including attic assessments and safe removal, visit our Mold Clean Up Services page and let’s get your house breathing right again.